
It started as getting a wonderful old retired MacBook Pro from my brother. I thought "Why not make a real x86 k8s cluster?". Using K3s is easy so let's get started. For the PVC we will use a Synology NAS and borrow from this blog's guide.
Some pre-work: I used Ubuntu 20.04 and burned a DVD (yes, i still have a drawer including CompUSA discs). After a few attempts, I got the A1278 loaded with Ubuntu and running. I then installed k3s the standard way.
curl -sfL https://get.k3s.io | sh -Setting up NFS PVC
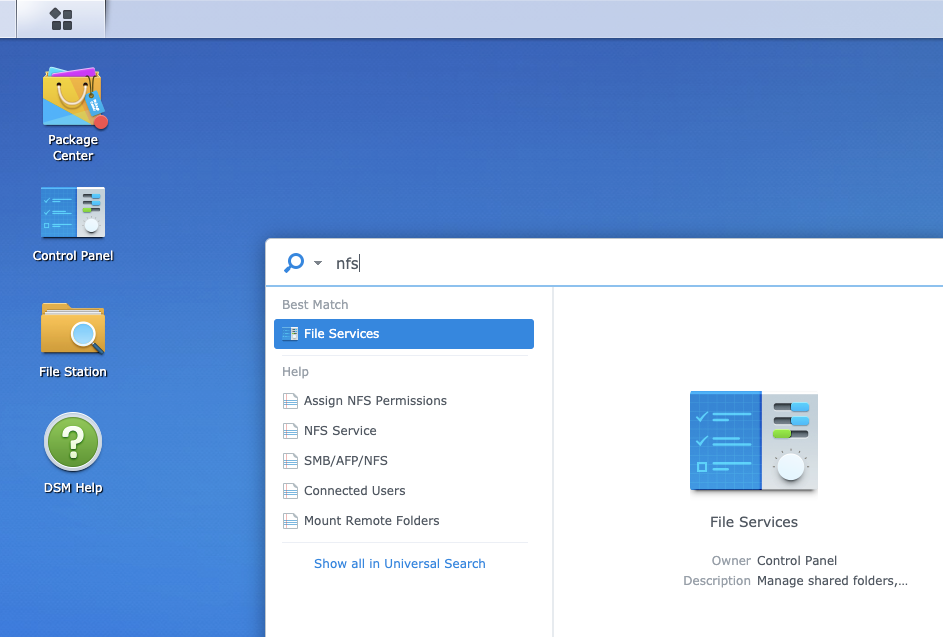
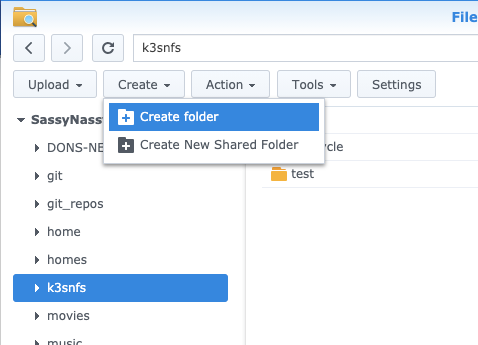
Let's use our Synology NAS. Login to NAS and create an NFS share
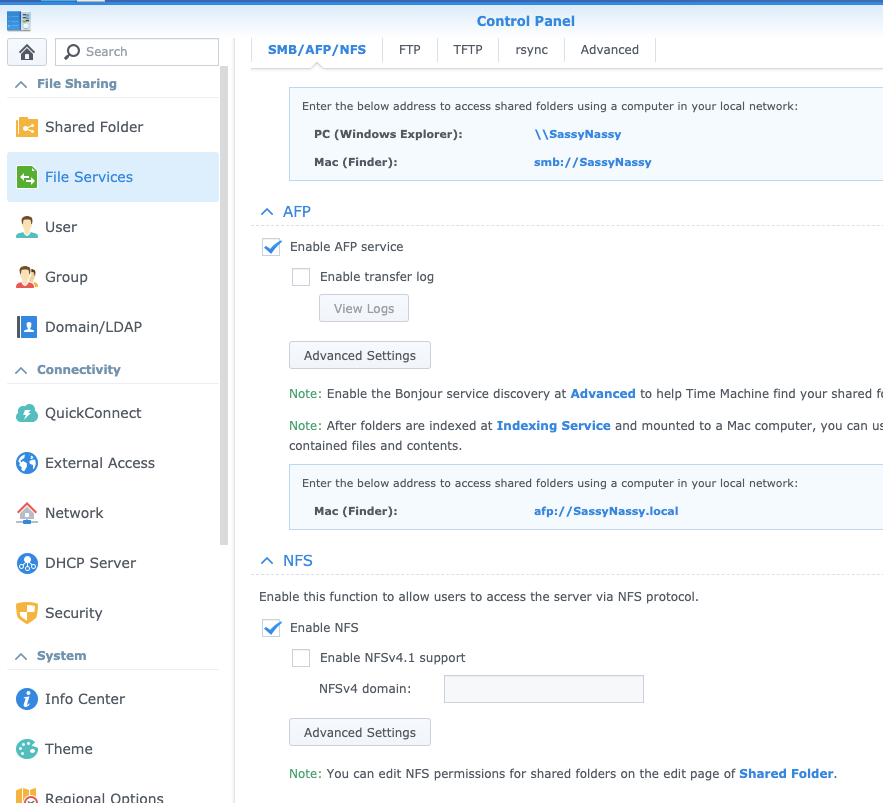
Here we see we enabled NFS:
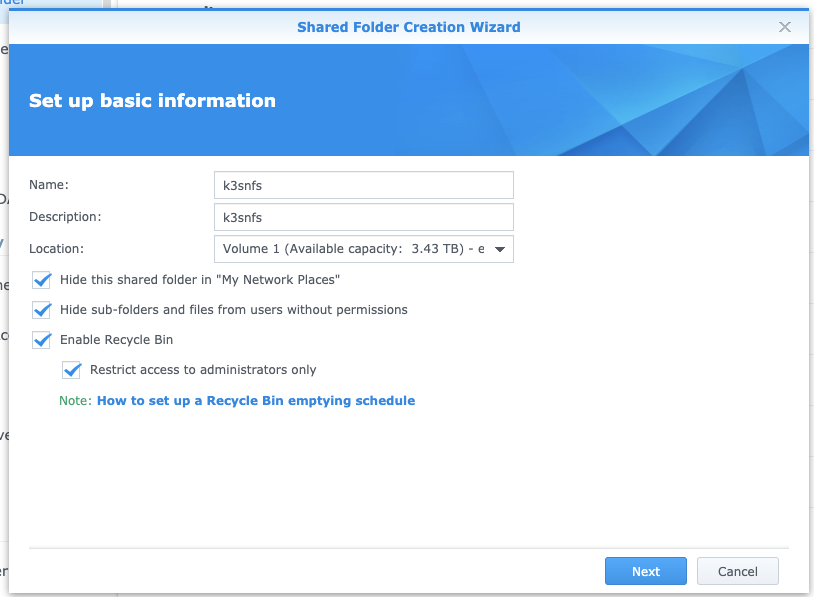
Next, let’s create the NFS share for k3s
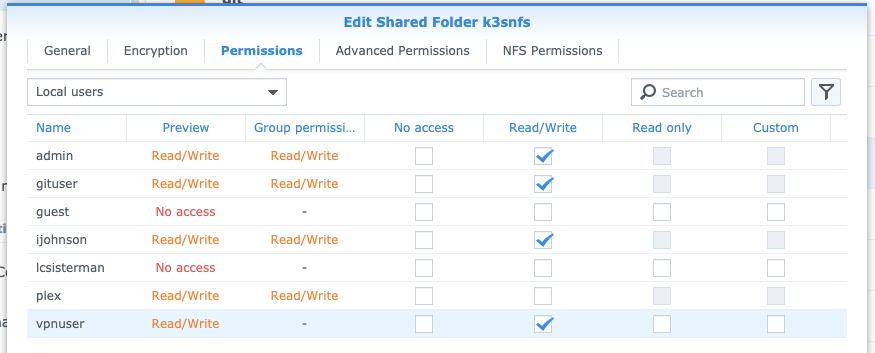
Next, on the permissions tab, edit to add some permissions.. This is just an example:
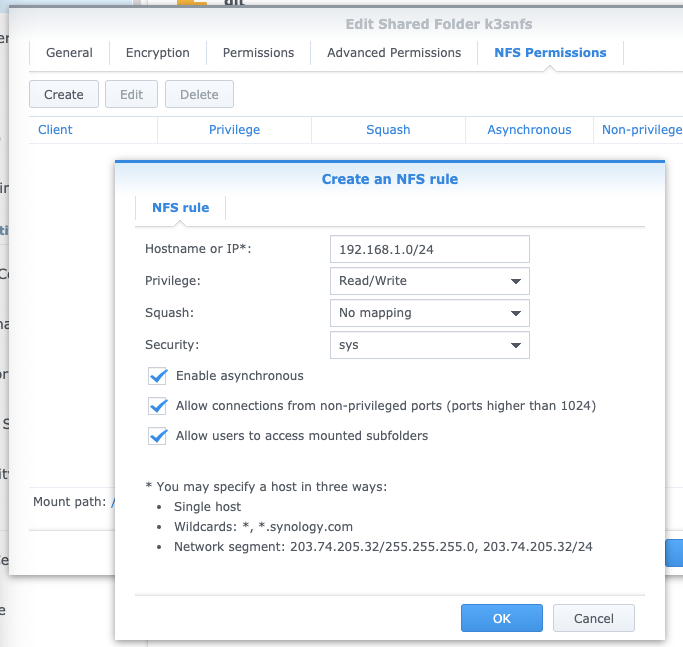
We want to then go to the NFS permissions.
Choose create, then add a CIDR for your network. My local k3s’s are on 192.168.x.x
Let’s test…
First, get nfs-common if you don’t already have it:
isaac@isaac-MacBookPro:~$ sudo apt update
[sudo] password for isaac:
Hit:1 http://us.archive.ubuntu.com/ubuntu focal InRelease
Get:2 http://us.archive.ubuntu.com/ubuntu focal-updates InRelease [111 kB]
Hit:3 https://download.docker.com/linux/ubuntu focal InRelease
Get:4 http://security.ubuntu.com/ubuntu focal-security InRelease [107 kB]
Get:5 http://us.archive.ubuntu.com/ubuntu focal-backports InRelease [98.3 kB]
Get:6 http://us.archive.ubuntu.com/ubuntu focal-updates/main i386 Packages [373 kB]
Get:7 http://us.archive.ubuntu.com/ubuntu focal-updates/main amd64 Packages [665 kB]
Get:8 http://us.archive.ubuntu.com/ubuntu focal-updates/main Translation-en [166 kB]
Get:9 http://us.archive.ubuntu.com/ubuntu focal-updates/main amd64 DEP-11 Metadata [236 kB]
Get:10 http://us.archive.ubuntu.com/ubuntu focal-updates/main DEP-11 48x48 Icons [54.3 kB]
Get:11 http://us.archive.ubuntu.com/ubuntu focal-updates/main DEP-11 64x64 Icons [86.5 kB]
Get:12 http://us.archive.ubuntu.com/ubuntu focal-updates/main amd64 c-n-f Metadata [11.0 kB]
Get:13 http://us.archive.ubuntu.com/ubuntu focal-updates/restricted i386 Packages [13.4 kB]
Get:14 http://us.archive.ubuntu.com/ubuntu focal-updates/restricted amd64 Packages [95.7 kB]
Get:15 http://us.archive.ubuntu.com/ubuntu focal-updates/restricted Translation-en [14.8 kB]
Get:16 http://us.archive.ubuntu.com/ubuntu focal-updates/universe i386 Packages [513 kB]
Get:17 http://us.archive.ubuntu.com/ubuntu focal-updates/universe amd64 Packages [690 kB]
Get:18 http://security.ubuntu.com/ubuntu focal-security/main amd64 DEP-11 Metadata [24.3 kB]
Get:19 http://us.archive.ubuntu.com/ubuntu focal-updates/universe Translation-en [133 kB]
Get:20 http://us.archive.ubuntu.com/ubuntu focal-updates/universe amd64 DEP-11 Metadata [205 kB]
Get:21 http://us.archive.ubuntu.com/ubuntu focal-updates/multiverse amd64 Packages [20.0 kB]
Get:22 http://us.archive.ubuntu.com/ubuntu focal-updates/multiverse i386 Packages [5,912 B]
Get:23 http://us.archive.ubuntu.com/ubuntu focal-updates/multiverse Translation-en [4,668 B]
Get:24 http://us.archive.ubuntu.com/ubuntu focal-updates/multiverse amd64 DEP-11 Metadata [2,468 B]
Get:25 http://us.archive.ubuntu.com/ubuntu focal-updates/multiverse amd64 c-n-f Metadata [552 B]
Get:26 http://us.archive.ubuntu.com/ubuntu focal-backports/universe amd64 DEP-11 Metadata [1,768 B]
Get:27 http://security.ubuntu.com/ubuntu focal-security/universe amd64 DEP-11 Metadata [56.6 kB]
Fetched 3,689 kB in 2s (2,128 kB/s)
Reading package lists... Done
Building dependency tree
Reading state information... Done
8 packages can be upgraded. Run 'apt list --upgradable' to see them.
isaac@isaac-MacBookPro:~$ sudo apt install nfs-common
Reading package lists... Done
Building dependency tree
Reading state information... Done
nfs-common is already the newest version (1:1.3.4-2.5ubuntu3.3).
The following package was automatically installed and is no longer required:
  libfprint-2-tod1
Use 'sudo apt autoremove' to remove it.
0 upgraded, 0 newly installed, 0 to remove and 8 not upgraded.
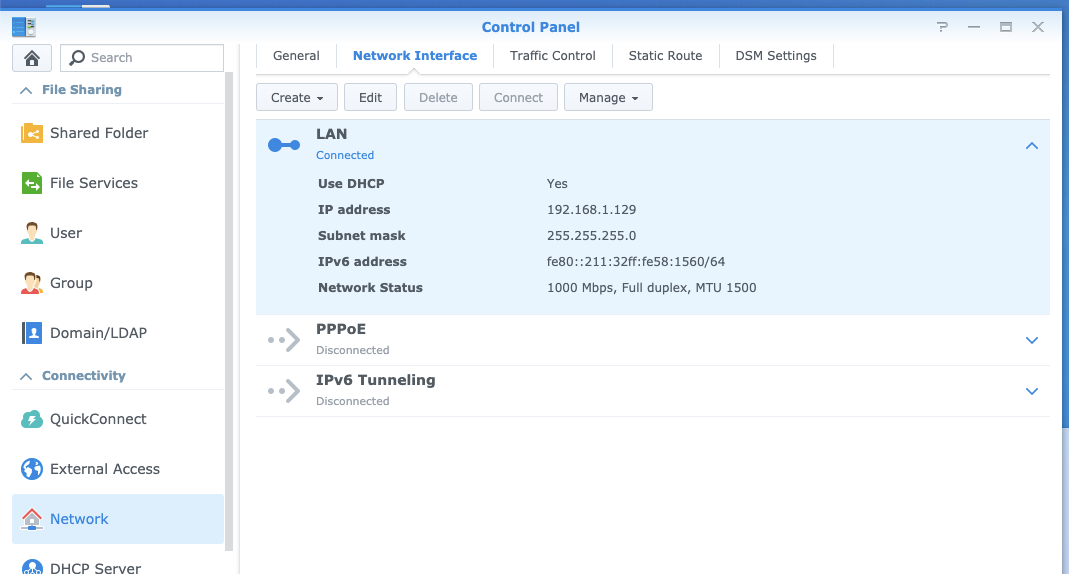
We can see the local LAN IP of our NAS in Network:
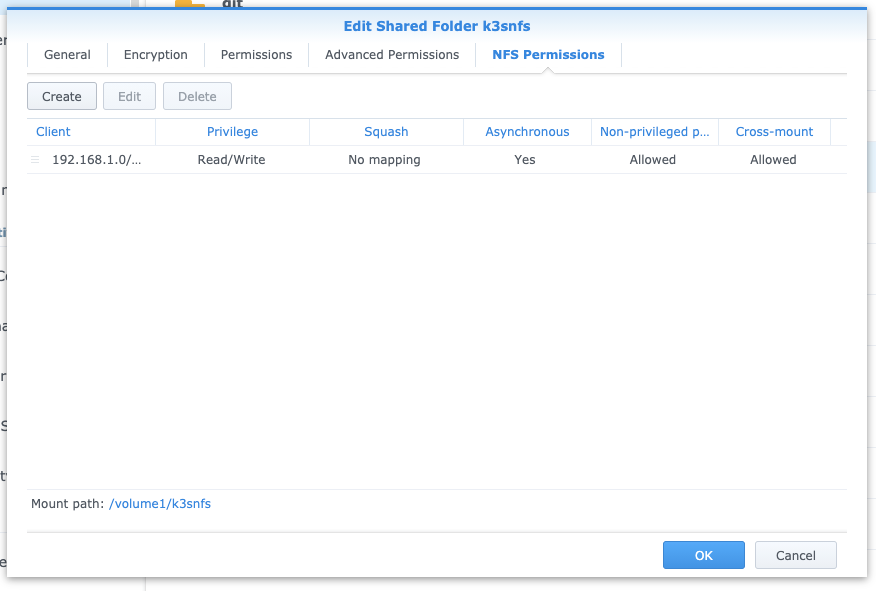
We can remind ourself of the mount path from the edit shared folder details:

For verification later, we can create a test folder
Now when we test, we can see the mount is exposed:
isaac@isaac-MacBookPro:~$ sudo mount -t nfs 192.168.1.129:/volume1/k3snfs /mnt/nfs/k3snfs
isaac@isaac-MacBookPro:~$ ls -ltra /mnt/nfs/k3snfs/
total 20
drwxrwxrwx 2 root root  4096 Nov 16 12:02 '#recycle'
drwxr-xr-x 3 root root  4096 Nov 16 12:09  ..
drwxrwxrwx 2 1026 users 4096 Nov 16 12:19  test
drwxrwxrwx 5 root root  4096 Nov 16 12:19  .
Setting up NFS Provisioner
Let’s look at the NFS YAML for the NFS Provisioner.
First some pre-work, getting SA and RBAC rules in place:
$ cat k3s-prenfs.yaml
apiVersion: v1
kind: ServiceAccount
metadata:
  name: nfs-client-provisioner
  # replace with namespace where provisioner is deployed
  namespace: default
---
kind: ClusterRole
apiVersion: rbac.authorization.k8s.io/v1
metadata:
  name: nfs-client-provisioner-runner
rules:
  - apiGroups: [""]
    resources: ["persistentvolumes"]
    verbs: ["get", "list", "watch", "create", "delete"]
  - apiGroups: [""]
    resources: ["persistentvolumeclaims"]
    verbs: ["get", "list", "watch", "update"]
  - apiGroups: ["storage.k8s.io"]
    resources: ["storageclasses"]
    verbs: ["get", "list", "watch"]
  - apiGroups: [""]
    resources: ["events"]
    verbs: ["create", "update", "patch"]
---
kind: ClusterRoleBinding
apiVersion: rbac.authorization.k8s.io/v1
metadata:
  name: run-nfs-client-provisioner
subjects:
  - kind: ServiceAccount
    name: nfs-client-provisioner
    # replace with namespace where provisioner is deployed
    namespace: default
roleRef:
  kind: ClusterRole
  name: nfs-client-provisioner-runner
  apiGroup: rbac.authorization.k8s.io
---
kind: Role
apiVersion: rbac.authorization.k8s.io/v1
metadata:
  name: leader-locking-nfs-client-provisioner
  # replace with namespace where provisioner is deployed
  namespace: default
rules:
  - apiGroups: [""]
    resources: ["endpoints"]
    verbs: ["get", "list", "watch", "create", "update", "patch"]
---
kind: RoleBinding
apiVersion: rbac.authorization.k8s.io/v1
metadata:
  name: leader-locking-nfs-client-provisioner
  # replace with namespace where provisioner is deployed
  namespace: default
subjects:
  - kind: ServiceAccount
    name: nfs-client-provisioner
    # replace with namespace where provisioner is deployed
    namespace: default
roleRef:
  kind: Role
  name: leader-locking-nfs-client-provisioner
  apiGroup: rbac.authorization.k8s.io
---
apiVersion: storage.k8s.io/v1
kind: StorageClass
metadata:
  name: managed-nfs-storage
provisioner: fuseim.pri/ifs # or choose another name, must match deployment's env PROVISIONER_NAME'
parameters:
  archiveOnDelete: "false"
  allowVolumeExpansion: "true"
  reclaimPolicy: "Delete"
allowVolumeExpansion: true
Then create the NFS YAML:
$ cat k3s-nfs.yaml
apiVersion: apps/v1
kind: Deployment
metadata:
  name: nfs-client-provisioner
  labels:
    app: nfs-client-provisioner
  # replace with namespace where provisioner is deployed
  namespace: default
spec:
  replicas: 1
  strategy:
    type: Recreate
  selector:
    matchLabels:
      app: nfs-client-provisioner
  template:
    metadata:
      labels:
        app: nfs-client-provisioner
    spec:
      serviceAccountName: nfs-client-provisioner
      containers:
        - name: nfs-client-provisioner
          image: quay.io/external_storage/nfs-client-provisioner:latest
          volumeMounts:
            - name: nfs-client-root
              mountPath: /persistentvolumes
          env:
            - name: PROVISIONER_NAME
              value: fuseim.pri/ifs
            - name: NFS_SERVER
              value: 192.168.1.129
            - name: NFS_PATH
              value: /volume1/k3snfs
      volumes:
        - name: nfs-client-root
          nfs:
            server: 192.168.1.129
            path: /volume1/k3snfs
Apply pre-NFS
$ kubectl apply -f k3s-prenfs.yaml
serviceaccount/nfs-client-provisioner unchanged
clusterrole.rbac.authorization.k8s.io/nfs-client-provisioner-runner unchanged
clusterrolebinding.rbac.authorization.k8s.io/run-nfs-client-provisioner unchanged
role.rbac.authorization.k8s.io/leader-locking-nfs-client-provisioner unchanged
rolebinding.rbac.authorization.k8s.io/leader-locking-nfs-client-provisioner created
storageclass.storage.k8s.io/managed-nfs-storage created
And now apply NFS
isaac@isaac-MacBookPro:~$ kubectl apply -f k3s-nfs.yaml
deployment.apps/nfs-client-provisioner created
Let’s check our current storage classes:
$ kubectl get sc
NAME                   PROVISIONER             RECLAIMPOLICY   VOLUMEBINDINGMODE      ALLOWVOLUMEEXPANSION   AGE
local-path (default)   rancher.io/local-path   Delete          WaitForFirstConsumer   false                  20h
managed-nfs-storage    fuseim.pri/ifs          Delete          Immediate              true                   6m24s
We can now switch the default provisioner:
isaac@isaac-MacBookPro:~$ kubectl patch storageclass local-path -p '{"metadata":{"annotations":{"storageclass.kubernetes.io/is-default-class":"false"}}}'
storageclass.storage.k8s.io/local-path patched
isaac@isaac-MacBookPro:~$ kubectl patch storageclass managed-nfs-storage -p '{"metadata": {"annotations":{"storageclass.kubernetes.io/is-default-class":"true"}}}'
storageclass.storage.k8s.io/managed-nfs-storage patched
isaac@isaac-MacBookPro:~$ kubectl get sc
NAME                            PROVISIONER             RECLAIMPOLICY   VOLUMEBINDINGMODE      ALLOWVOLUMEEXPANSION   AGE
local-path                      rancher.io/local-path   Delete          WaitForFirstConsumer   false                  20h
managed-nfs-storage (default)   fuseim.pri/ifs          Delete          Immediate              true                   7m38s
We can now test with a chart for Redis-HA that will require a working PVC:
$ helm repo add dandydev https://dandydeveloper.github.io/charts
"dandydev" has been added to your repositories
$ helm install dandydev/redis-ha --generate-name
NAME: redis-ha-1605552203
LAST DEPLOYED: Mon Nov 16 12:43:24 2020
NAMESPACE: default
STATUS: deployed
REVISION: 1
NOTES:
Redis can be accessed via port 6379   and Sentinel can be accessed via port 26379    on the following DNS name from within your cluster:
redis-ha-1605552203.default.svc.cluster.local

To connect to your Redis server:
1. Run a Redis pod that you can use as a client:

   kubectl exec -it redis-ha-1605552203-server-0 sh -n default

2. Connect using the Redis CLI:

  redis-cli -h redis-ha-1605552203.default.svc.cluster.local
Validation:
$ kubectl get pvc
NAME                                STATUS   VOLUME                                     CAPACITY   ACCESS MODES   STORAGECLASS          AGE
data-redis-ha-1605552203-server-0   Bound    pvc-35be9319-4b0b-429e-82f6-6fbf3afab721   10Gi       RWO            managed-nfs-storage   38s


isaac@isaac-MacBookPro:~$ kubectl exec -it redis-ha-1605552203-server-0 sh -n default
kubectl exec [POD] [COMMAND] is DEPRECATED and will be removed in a future version. Use kubectl exec [POD] -- [COMMAND] instead.
Defaulting container name to redis.
Use 'kubectl describe pod/redis-ha-1605552203-server-0 -n default' to see all of the containers in this pod.
/data $ redis-cli -h redis-ha-1605552203.default.svc.cluster.local
redis-ha-1605552203.default.svc.cluster.local:6379> set key=value
(error) ERR wrong number of arguments for 'set' command
redis-ha-1605552203.default.svc.cluster.local:6379> set key value
(error) NOREPLICAS Not enough good replicas to write.
There is a bit of a known bug in replicas (slaves) so you can update the configmap and test again:
isaac@isaac-MacBookPro:~$ kubectl get cm redis-ha-1605552203-configmap -o yaml > redis-ha-cm.yaml
isaac@isaac-MacBookPro:~$ kubectl get cm redis-ha-1605552203-configmap -o yaml > redis-ha-cm.yaml.old
isaac@isaac-MacBookPro:~$ vi redis-ha-cm.yaml
isaac@isaac-MacBookPro:~$ diff redis-ha-cm.yaml redis-ha-cm.yaml.old
61c61
<     min-replicas-to-write 0
---
>     min-replicas-to-write 1
isaac@isaac-MacBookPro:~$ kubectl apply -f redis-ha-cm.yaml
Warning: kubectl apply should be used on resource created by either kubectl create --save-config or kubectl apply
configmap/redis-ha-1605552203-configmap configured


$ kubectl delete pod -l app=redis-ha
pod "redis-ha-1605552203-server-0" deleted
pod "redis-ha-1605552203-server-1" deleted

isaac@isaac-MacBookPro:~$ kubectl exec -it redis-ha-1605552203-server-0 sh -n default
kubectl exec [POD] [COMMAND] is DEPRECATED and will be removed in a future version. Use kubectl exec [POD] -- [COMMAND] instead.
Defaulting container name to redis.
Use 'kubectl describe pod/redis-ha-1605552203-server-0 -n default' to see all of the containers in this pod.
/data $ redis-cli -h redis-ha-1605552203.default.svc.cluster.local
redis-ha-1605552203.default.svc.cluster.local:6379> set asdf asdf
OK
redis-ha-1605552203.default.svc.cluster.local:6379> get asdf
"asdf"
redis-ha-1605552203.default.svc.cluster.local:6379>
Lastly, if you left your mount up for k3snfs on the master node, you can see the PVCs created:
isaac@isaac-MacBookPro:~$ kubectl get pvc
NAME                                STATUS   VOLUME                                     CAPACITY   ACCESS MODES   STORAGECLASS          AGE
data-redis-ha-1605552203-server-0   Bound    pvc-35be9319-4b0b-429e-82f6-6fbf3afab721   10Gi       RWO            managed-nfs-storage   10m
data-redis-ha-1605552203-server-1   Bound    pvc-17c79f00-ac73-454f-a664-e02de9158bd5   10Gi       RWO            managed-nfs-storage   9m37s


isaac@isaac-MacBookPro:~$ ls /mnt/nfs/k3snfs/
 default-data-redis-ha-1605552203-server-0-pvc-35be9319-4b0b-429e-82f6-6fbf3afab721  '#recycle'
 default-data-redis-ha-1605552203-server-1-pvc-17c79f00-ac73-454f-a664-e02de9158bd5   test
Note: since one pod was pending, i checked and found the underlying issue was HA rather insists on at least 2 nodes and my k3s (at this point) just has one:
Events:
  Type     Reason            Age   From               Message
  ----     ------            ----  ----               -------
  Warning  FailedScheduling  2m9s  default-scheduler  0/1 nodes are available: 1 node(s) didn't match pod affinity/anti-affinity, 1 node(s) didn't match pod anti-affinity rules.
  Warning  FailedScheduling  2m9s  default-scheduler  0/1 nodes are available: 1 node(s) didn't match pod affinity/anti-affinity, 1 node(s) didn't match pod anti-affinity rules.
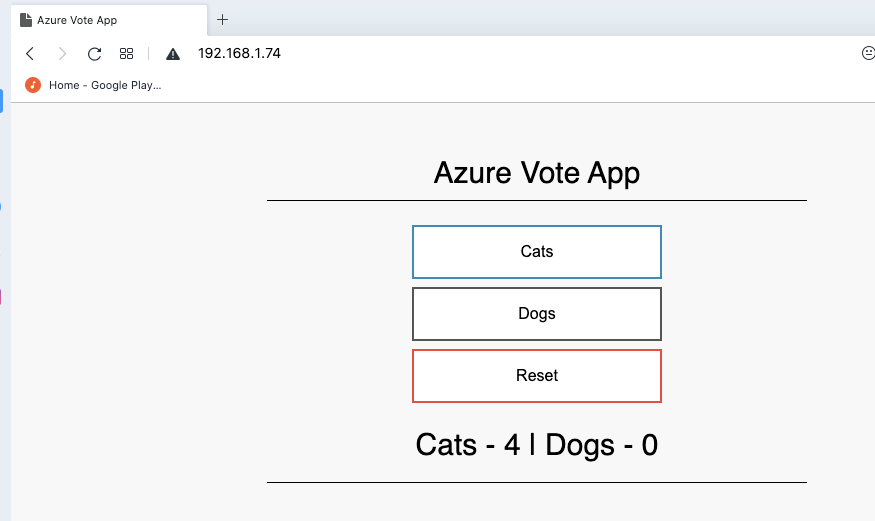
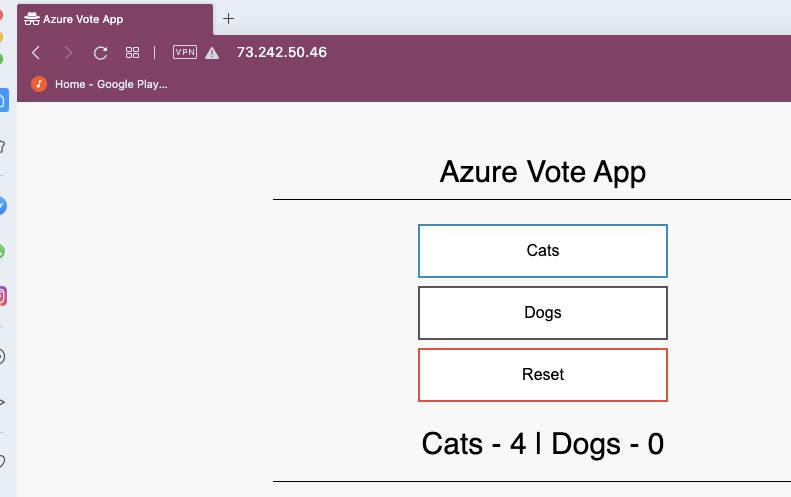
The next step was to use a two tier app with persistance (via Redis). This time i used the Azure Voting App - a quickstart often used to validate AKS.
Instead of using the YAML, we can leverage the Helm Chart for this app
$ helm repo add azure-samples https://azure-samples.github.io/helm-charts/
$ helm repo update
$ helm install azure-samples/azure-vote --generate-name
External Routing
One minor issue we have at this point is our 1 node cluster has just one IP to give. If we set a LB on a service, it will take that IP and not give it up for others:
$ kubectl get svc
NAME                              TYPE           CLUSTER-IP      EXTERNAL-IP    PORT(S)              AGE
kubernetes                        ClusterIP      10.43.0.1       <none>         443/TCP              22h
redis-ha-1605552203               ClusterIP      None            <none>         6379/TCP,26379/TCP   126m
redis-ha-1605552203-announce-2    ClusterIP      10.43.52.66     <none>         6379/TCP,26379/TCP   126m
redis-ha-1605552203-announce-0    ClusterIP      10.43.225.168   <none>         6379/TCP,26379/TCP   126m
redis-ha-1605552203-announce-1    ClusterIP      10.43.47.207    <none>         6379/TCP,26379/TCP   126m
vote-back-azure-vote-1605556998   ClusterIP      10.43.96.147    <none>         6379/TCP             46m
azure-vote-front                  LoadBalancer   10.43.59.63     192.168.1.74   80:32293/TCP         46m
ambassador-admin                  NodePort       10.43.25.213    <none>         8877:30206/TCP       38m
ambassador                        LoadBalancer   10.43.166.171   <pending>      80:30762/TCP         38m
One thing I did was switch to Ambassador over Traefik following this guide: https://rancher.com/blog/2020/deploy-an-ingress-controllers
isaac@isaac-MacBookPro:~$ vi /etc/systemd/system/k3s.service
isaac@isaac-MacBookPro:~$ sudo vi /etc/systemd/system/k3s.service
[sudo] password for isaac:
isaac@isaac-MacBookPro:~$ sudo cat  /etc/systemd/system/k3s.service | tail -n5
ExecStartPre=-/sbin/modprobe overlay
ExecStart=/usr/local/bin/k3s \
    server \
    --disable traefik \
isaac@isaac-MacBookPro:~$ sudo systemctl daemon-reload
isaac@isaac-MacBookPro:~$ sudo systemctl restart k3s.service
Then I deleted the former service (which was holding the IP):
$ kubectl get svc azure-vote-front  -o yaml > ~/Downloads/azure-vote-front-svc.yml
$ kubectl delete svc azure-vote-front
service "azure-vote-front" deleted
Verify ambassador gets the IP:
$ kubectl get svc --all-namespaces
NAMESPACE     NAME                              TYPE           CLUSTER-IP      EXTERNAL-IP   PORT(S)                  AGE
default       kubernetes                        ClusterIP      10.43.0.1       <none>        443/TCP                  22h
kube-system   kube-dns                          ClusterIP      10.43.0.10      <none>        53/UDP,53/TCP,9153/TCP   22h
kube-system   metrics-server                    ClusterIP      10.43.229.85    <none>        443/TCP                  22h
default       redis-ha-1605552203               ClusterIP      None            <none>        6379/TCP,26379/TCP       126m
default       redis-ha-1605552203-announce-2    ClusterIP      10.43.52.66     <none>        6379/TCP,26379/TCP       126m
default       redis-ha-1605552203-announce-0    ClusterIP      10.43.225.168   <none>        6379/TCP,26379/TCP       126m
default       redis-ha-1605552203-announce-1    ClusterIP      10.43.47.207    <none>        6379/TCP,26379/TCP       126m
default       vote-back-azure-vote-1605556998   ClusterIP      10.43.96.147    <none>        6379/TCP                 46m
default       ambassador-admin                  NodePort       10.43.25.213    <none>        8877:30206/TCP           39m
default       ambassador                        LoadBalancer   10.43.166.171   <pending>     80:30762/TCP             38m

$ kubectl get svc --all-namespaces
NAMESPACE     NAME                              TYPE           CLUSTER-IP      EXTERNAL-IP    PORT(S)                  AGE
default       kubernetes                        ClusterIP      10.43.0.1       <none>         443/TCP                  22h
kube-system   kube-dns                          ClusterIP      10.43.0.10      <none>         53/UDP,53/TCP,9153/TCP   22h
kube-system   metrics-server                    ClusterIP      10.43.229.85    <none>         443/TCP                  22h
default       redis-ha-1605552203               ClusterIP      None            <none>         6379/TCP,26379/TCP       127m
default       redis-ha-1605552203-announce-2    ClusterIP      10.43.52.66     <none>         6379/TCP,26379/TCP       127m
default       redis-ha-1605552203-announce-0    ClusterIP      10.43.225.168   <none>         6379/TCP,26379/TCP       127m
default       redis-ha-1605552203-announce-1    ClusterIP      10.43.47.207    <none>         6379/TCP,26379/TCP       127m
default       vote-back-azure-vote-1605556998   ClusterIP      10.43.96.147    <none>         6379/TCP                 47m
default       ambassador-admin                  NodePort       10.43.25.213    <none>         8877:30206/TCP           39m
default       ambassador                        LoadBalancer   10.43.166.171   192.168.1.74   80:30762/TCP             38m
Now I can create the service albeit with a pending IP:
$ kubectl apply -f ~/Downloads/azure-vote-front-svc.yml
service/azure-vote-front created
JOHNSI10-M1:mlife-carelink-cied-data-service johnsi10$ kubectl get svc
NAME                              TYPE           CLUSTER-IP      EXTERNAL-IP    PORT(S)              AGE
kubernetes                        ClusterIP      10.43.0.1       <none>         443/TCP              22h
redis-ha-1605552203               ClusterIP      None            <none>         6379/TCP,26379/TCP   132m
redis-ha-1605552203-announce-2    ClusterIP      10.43.52.66     <none>         6379/TCP,26379/TCP   132m
redis-ha-1605552203-announce-0    ClusterIP      10.43.225.168   <none>         6379/TCP,26379/TCP   132m
redis-ha-1605552203-announce-1    ClusterIP      10.43.47.207    <none>         6379/TCP,26379/TCP   132m
vote-back-azure-vote-1605556998   ClusterIP      10.43.96.147    <none>         6379/TCP             52m
ambassador-admin                  NodePort       10.43.25.213    <none>         8877:30206/TCP       45m
ambassador                        LoadBalancer   10.43.166.171   192.168.1.74   80:30762/TCP         44m
azure-vote-front                  LoadBalancer   10.43.59.63     <pending>      80:32293/TCP         4s
Next, I created a mapping for the Ambassador ingress:
$ cat azure-vote-ingress.yaml
apiVersion: getambassador.io/v2
kind: Mapping
metadata:
  name: azure-vote-frontend
spec:
  prefix: /
  service: azure-vote-front
And applied it:
$ kubectl apply -f azure-vote-ingress.yaml
mapping.getambassador.io/azure-vote-frontend configured
Now I could see my App in my network.
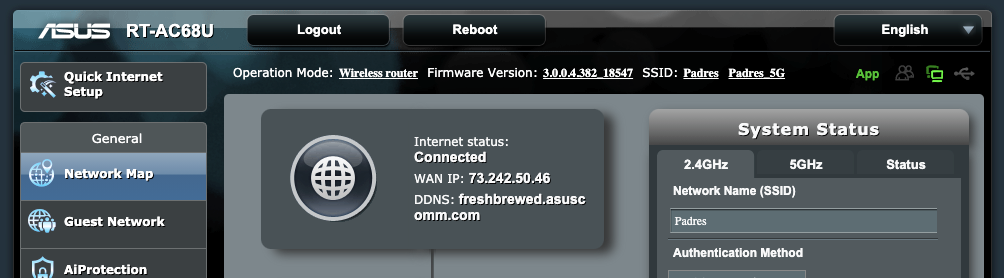
But what about externalizing it?
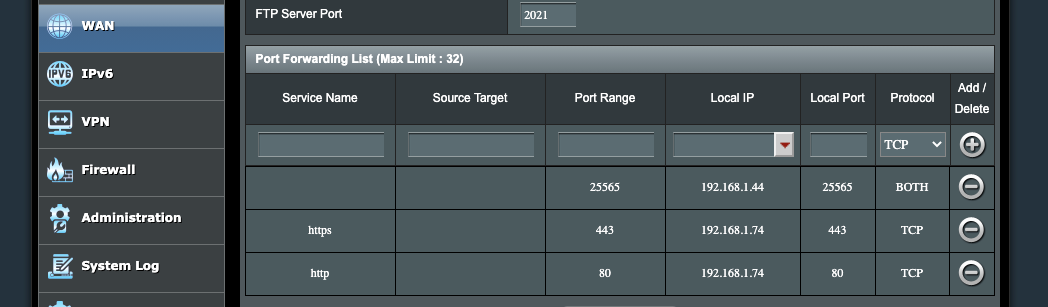
My home network, at this point, has just one exposed IP. so I could port forward:
And forward http and https to the K3s on the laptop:
And to see it work, (using a private VPN’ed Opera window):
Getting TLS/SSL working
Let’s install the cert manager:
$ kubectl apply --validate=false -f https://github.com/jetstack/cert-manager/releases/download/v1.0.4/cert-manager.yaml
customresourcedefinition.apiextensions.k8s.io/certificaterequests.cert-manager.io created
customresourcedefinition.apiextensions.k8s.io/certificates.cert-manager.io created
customresourcedefinition.apiextensions.k8s.io/challenges.acme.cert-manager.io created
customresourcedefinition.apiextensions.k8s.io/clusterissuers.cert-manager.io created
customresourcedefinition.apiextensions.k8s.io/issuers.cert-manager.io created
customresourcedefinition.apiextensions.k8s.io/orders.acme.cert-manager.io created
namespace/cert-manager created
serviceaccount/cert-manager-cainjector created
serviceaccount/cert-manager created
serviceaccount/cert-manager-webhook created
clusterrole.rbac.authorization.k8s.io/cert-manager-cainjector created
clusterrole.rbac.authorization.k8s.io/cert-manager-controller-issuers created
clusterrole.rbac.authorization.k8s.io/cert-manager-controller-clusterissuers created
clusterrole.rbac.authorization.k8s.io/cert-manager-controller-certificates created
clusterrole.rbac.authorization.k8s.io/cert-manager-controller-orders created
clusterrole.rbac.authorization.k8s.io/cert-manager-controller-challenges created
clusterrole.rbac.authorization.k8s.io/cert-manager-controller-ingress-shim created
clusterrole.rbac.authorization.k8s.io/cert-manager-view created
clusterrole.rbac.authorization.k8s.io/cert-manager-edit created
clusterrolebinding.rbac.authorization.k8s.io/cert-manager-cainjector created
clusterrolebinding.rbac.authorization.k8s.io/cert-manager-controller-issuers created
clusterrolebinding.rbac.authorization.k8s.io/cert-manager-controller-clusterissuers created
clusterrolebinding.rbac.authorization.k8s.io/cert-manager-controller-certificates created
clusterrolebinding.rbac.authorization.k8s.io/cert-manager-controller-orders created
clusterrolebinding.rbac.authorization.k8s.io/cert-manager-controller-challenges created
clusterrolebinding.rbac.authorization.k8s.io/cert-manager-controller-ingress-shim created
role.rbac.authorization.k8s.io/cert-manager-cainjector:leaderelection created
role.rbac.authorization.k8s.io/cert-manager:leaderelection created
role.rbac.authorization.k8s.io/cert-manager-webhook:dynamic-serving created
rolebinding.rbac.authorization.k8s.io/cert-manager-cainjector:leaderelection created
rolebinding.rbac.authorization.k8s.io/cert-manager:leaderelection created
rolebinding.rbac.authorization.k8s.io/cert-manager-webhook:dynamic-serving created
service/cert-manager created
service/cert-manager-webhook created
deployment.apps/cert-manager-cainjector created
deployment.apps/cert-manager created
deployment.apps/cert-manager-webhook created
mutatingwebhookconfiguration.admissionregistration.k8s.io/cert-manager-webhook created
validatingwebhookconfiguration.admissionregistration.k8s.io/cert-manager-webhook created
Now test it
isaac@isaac-MacBookPro:~$ cat <<EOF > test-resources.yaml
> apiVersion: v1
> kind: Namespace
> metadata:
>   name: cert-manager-test
> ---
> apiVersion: cert-manager.io/v1
> kind: Issuer
> metadata:
>   name: test-selfsigned
>   namespace: cert-manager-test
> spec:
>   selfSigned: {}
> ---
> apiVersion: cert-manager.io/v1
> kind: Certificate
> metadata:
>   name: selfsigned-cert
>   namespace: cert-manager-test
> spec:
>   dnsNames:
>     - example.com
>   secretName: selfsigned-cert-tls
>   issuerRef:
>     name: test-selfsigned
> EOF
isaac@isaac-MacBookPro:~$ kubectl apply -f test-resources.yaml
namespace/cert-manager-test created
issuer.cert-manager.io/test-selfsigned created
certificate.cert-manager.io/selfsigned-cert created
We can view the self-signed cert:
isaac@isaac-MacBookPro:~$ kubectl describe certificate -n cert-manager-test
Name:         selfsigned-cert
Namespace:    cert-manager-test
Labels:       <none>
Annotations:  <none>
API Version:  cert-manager.io/v1
Kind:         Certificate
Metadata:
  Creation Timestamp:  2020-11-16T23:15:34Z
  Generation:          1
  Managed Fields:
    API Version:  cert-manager.io/v1
    Fields Type:  FieldsV1
    fieldsV1:
      f:metadata:
        f:annotations:
          .:
          f:kubectl.kubernetes.io/last-applied-configuration:
      f:spec:
        .:
        f:dnsNames:
        f:issuerRef:
          .:
          f:name:
        f:secretName:
    Manager:      kubectl-client-side-apply
    Operation:    Update
    Time:         2020-11-16T23:15:34Z
    API Version:  cert-manager.io/v1
    Fields Type:  FieldsV1
    fieldsV1:
      f:spec:
        f:privateKey:
      f:status:
        .:
        f:conditions:
        f:notAfter:
        f:notBefore:
        f:renewalTime:
        f:revision:
    Manager:         controller
    Operation:       Update
    Time:            2020-11-16T23:15:36Z
  Resource Version:  71278
  Self Link:         /apis/cert-manager.io/v1/namespaces/cert-manager-test/certificates/selfsigned-cert
  UID:               264cf285-5efc-4d52-8865-136b95cb7c0e
Spec:
  Dns Names:
    example.com
  Issuer Ref:
    Name:       test-selfsigned
  Secret Name:  selfsigned-cert-tls
Status:
  Conditions:
    Last Transition Time:  2020-11-16T23:15:36Z
    Message:               Certificate is up to date and has not expired
    Reason:                Ready
    Status:                True
    Type:                  Ready
  Not After:               2021-02-14T23:15:35Z
  Not Before:              2020-11-16T23:15:35Z
  Renewal Time:            2021-01-15T23:15:35Z
  Revision:                1
Events:
  Type    Reason     Age   From          Message
  ----    ------     ----  ----          -------
  Normal  Issuing    17s   cert-manager  Issuing certificate as Secret does not exist
  Normal  Generated  16s   cert-manager  Stored new private key in temporary Secret resource "selfsigned-cert-ld2bv"
  Normal  Requested  16s   cert-manager  Created new CertificateRequest resource "selfsigned-cert-jz4tl"
  Normal  Issuing    16s   cert-manager  The certificate has been successfully issued
Create the ACME (LetsEncrypt) cluster issuer and apply it (more)
isaac@isaac-MacBookPro:~$ cat acme-issuer.yml
apiVersion: cert-manager.io/v1
kind: ClusterIssuer
metadata:
  name: letsencrypt-prod
  namespace: default
spec:
  acme:
    # The ACME server URL
    server: https://acme-v02.api.letsencrypt.org/directory
    # Email address used for ACME registration
    email: isaac.johnson@gmail.com
    # Name of a secret used to store the ACME account private key
    privateKeySecretRef:
      name: letsencrypt-prod
    # Enable the HTTP-01 challenge provider
    solvers:
    - http01:
        ingress:
          class: nginx
isaac@isaac-MacBookPro:~$ kubectl apply -f acme-issuer.yml
clusterissuer.cert-manager.io/letsencrypt-prod created
Create an A/AAAA record for a DNS name. Here we will use myk8s.tpk.best

Next we can create the cert (Note, however, I then realized i needed to swap in Nginx to complete)
isaac@isaac-MacBookPro:~$ cat mycert.yaml
apiVersion: cert-manager.io/v1
kind: Certificate
metadata:
  name: myk8s-tpk-best
  namespace: default
spec:
  secretName: myk8s.tpk.best-cert
  issuerRef:
    name: letsencrypt-prod
    kind: ClusterIssuer
  commonName: myk8s.tpk.best
  dnsNames:
  - myk8s.tpk.best
  acme:
    config:
    - http01:
        ingressClass: nginx
      domains:
      - myk8s.tpk.best
isaac@isaac-MacBookPro:~$ kubectl apply -f mycert.yaml --validate=false
certificate.cert-manager.io/myk8s-tpk-best created
For this next part, I actually had to remove ambassador and switch to Nginx since the cluster-issuer just didn’t want to do http01 with ambassador (404 instead of 200 replies)
$ kubectl delete -f https://www.getambassador.io/yaml/ambassador/ambassador-service.yaml
$ helm install my-release nginx-stable/nginx-ingress
Now try again:
$ cat mycert.yaml
apiVersion: cert-manager.io/v1
kind: Certificate
metadata:
  name: myk8s-tpk-best
  namespace: default
spec:
  secretName: myk8s.tpk.best-cert
  issuerRef:
    name: letsencrypt-prod
    kind: ClusterIssuer
  commonName: myk8s.tpk.best
  dnsNames:
  - myk8s.tpk.best
  acme:
    config:
    - http01:
        ingressClass: nginx
      domains:
      - myk8s.tpk.best

$ kubectl apply -f mycert.yaml --validate=false
certificate.cert-manager.io/myk8s-tpk-best created

$ kubectl get certificates
NAME             READY   SECRET                AGE
myk8s-tpk-best   True    myk8s.tpk.best-cert   97s
We can see my cert (I'll trim to 80 so it's not shown in full)
$ kubectl get secrets myk8s.tpk.best-cert -o yaml > my_certs.yml
$ cat my_certs.yml | cut -c -80
apiVersion: v1
data:
  tls.crt: LS0tLS1CRUdJTiBDRVJUSUZJQ0FURS0tLS0tCk1JSUZWRENDQkR5Z0F3SUJBZ0lTQk9rb
  tls.key: LS0tLS1CRUdJTiBSU0EgUFJJVkFURSBLRVktLS0tLQpNSUlFcGdJQkFBS0NBUUVBeDVxW
kind: Secret
metadata:
  annotations:
    cert-manager.io/alt-names: myk8s.tpk.best
    cert-manager.io/certificate-name: myk8s-tpk-best
    cert-manager.io/common-name: myk8s.tpk.best
    cert-manager.io/ip-sans: ""
    cert-manager.io/issuer-group: ""
    cert-manager.io/issuer-kind: ClusterIssuer
    cert-manager.io/issuer-name: letsencrypt-prod
    cert-manager.io/uri-sans: ""
  creationTimestamp: "2020-11-17T00:28:13Z"
  managedFields:
  - apiVersion: v1
    fieldsType: FieldsV1
    fieldsV1:
      f:data:
        .: {}
        f:tls.crt: {}
        f:tls.key: {}
      f:metadata:
        f:annotations:
          .: {}
          f:cert-manager.io/alt-names: {}
          f:cert-manager.io/certificate-name: {}
          f:cert-manager.io/common-name: {}
          f:cert-manager.io/ip-sans: {}
          f:cert-manager.io/issuer-group: {}
          f:cert-manager.io/issuer-kind: {}
          f:cert-manager.io/issuer-name: {}
          f:cert-manager.io/uri-sans: {}
      f:type: {}
    manager: controller
    operation: Update
    time: "2020-11-17T00:28:13Z"
  name: myk8s.tpk.best-cert
  namespace: default
  resourceVersion: "81445"
  selfLink: /api/v1/namespaces/default/secrets/myk8s.tpk.best-cert
  uid: d48d6661-fe95-473a-b072-1a2363419bfa
type: kubernetes.io/tls
Lastly, upgrade Nginx's Helm deployment with the values (clearly not trimmed as above, but the full long strings):
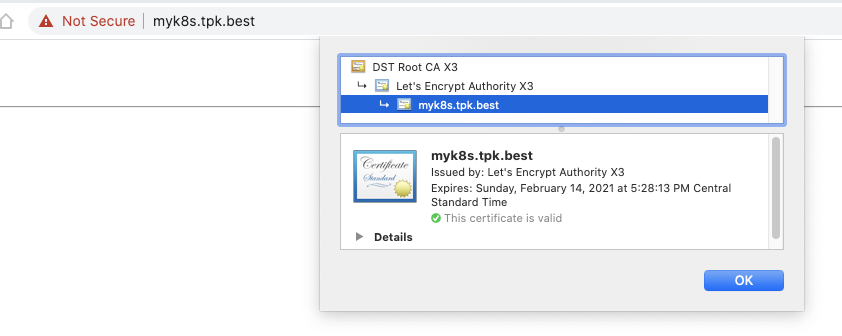
$ helm upgrade my-release nginx-stable/nginx-ingress --set controller.defaultTLS.cert=LS0**********K --set controller.defaultTLS.key=LS0********==
While Chrome is still being annoying about the Nginx page, the cert shows as valid:
Setup App Ingress
Next, let’s update our ingress and update it with some annotations:
    kubernetes.io/ingress.class: nginx
    nginx.ingress.kubernetes.io/force-ssl-redirect: "true"
    nginx.ingress.kubernetes.io/rewrite-target: /
    nginx.ingress.kubernetes.io/secure-backends: "true"
    nginx.ingress.kubernetes.io/ssl-redirect: "false"
And add the TLS link to the secret with the certs
spec:
  tls:
  - hosts:
    - myk8s.tpk.best
    secretName: myk8s.tpk.best-cert
So it should look similar
$ cat ingress.yaml
apiVersion: extensions/v1beta1
kind: Ingress
metadata:
  annotations:
    kubectl.kubernetes.io/last-applied-configuration: |
      {"apiVersion":"extensions/v1beta1","kind":"Ingress","metadata":{"annotations":{"kubernetes.io/ingress.class":"nginx","nginx.ingress.kubernetes.io/force-ssl-redirect":"true","nginx.ingress.kubernetes.io/rewrite-target":"/","nginx.ingress.kubernetes.io/secure-backends":"true","nginx.ingress.kubernetes.io/ssl-redirect":"false"},"creationTimestamp":"2020-11-17T00:40:47Z","generation":1,"managedFields":[{"apiVersion":"networking.k8s.io/v1beta1","fieldsType":"FieldsV1","fieldsV1":{"f:metadata":{"f:annotations":{".":{},"f:kubectl.kubernetes.io/last-applied-configuration":{},"f:kubernetes.io/ingress.class":{}}},"f:spec":{"f:rules":{}}},"manager":"kubectl-client-side-apply","operation":"Update","time":"2020-11-17T00:40:47Z"},{"apiVersion":"networking.k8s.io/v1beta1","fieldsType":"FieldsV1","fieldsV1":{"f:status":{"f:loadBalancer":{"f:ingress":{}}}},"manager":"nginx-ingress","operation":"Update","time":"2020-11-17T00:40:48Z"}],"name":"ingress-myserviceb","namespace":"default","resourceVersion":"83304","selfLink":"/apis/extensions/v1beta1/namespaces/default/ingresses/ingress-myserviceb","uid":"23b28464-7e25-46eb-ba74-8cdd873c11c1"},"spec":{"rules":[{"host":"myk8s.tpk.best","http":{"paths":[{"backend":{"serviceName":"azure-vote-front","servicePort":80},"path":"/","pathType":"ImplementationSpecific"}]}}]},"status":{"loadBalancer":{"ingress":[{"ip":"192.168.1.74"}]}}}
    kubernetes.io/ingress.class: nginx
    nginx.ingress.kubernetes.io/force-ssl-redirect: "true"
    nginx.ingress.kubernetes.io/rewrite-target: /
    nginx.ingress.kubernetes.io/secure-backends: "true"
    nginx.ingress.kubernetes.io/ssl-redirect: "false"
  creationTimestamp: "2020-11-17T00:40:47Z"
  generation: 1
  managedFields:
  - apiVersion: networking.k8s.io/v1beta1
    fieldsType: FieldsV1
    fieldsV1:
      f:metadata:
        f:annotations:
          .: {}
          f:kubernetes.io/ingress.class: {}
      f:spec:
        f:rules: {}
    manager: kubectl-client-side-apply
    operation: Update
    time: "2020-11-17T00:40:47Z"
  - apiVersion: networking.k8s.io/v1beta1
    fieldsType: FieldsV1
    fieldsV1:
      f:status:
        f:loadBalancer:
          f:ingress: {}
    manager: nginx-ingress
    operation: Update
    time: "2020-11-17T00:40:48Z"
  - apiVersion: extensions/v1beta1
    fieldsType: FieldsV1
    fieldsV1:
      f:metadata:
        f:annotations:
          f:kubectl.kubernetes.io/last-applied-configuration: {}
          f:nginx.ingress.kubernetes.io/force-ssl-redirect: {}
          f:nginx.ingress.kubernetes.io/rewrite-target: {}
          f:nginx.ingress.kubernetes.io/secure-backends: {}
          f:nginx.ingress.kubernetes.io/ssl-redirect: {}
    manager: kubectl
    operation: Update
    time: "2020-11-17T01:38:52Z"
  name: ingress-myserviceb
  namespace: default
  resourceVersion: "91647"
  selfLink: /apis/extensions/v1beta1/namespaces/default/ingresses/ingress-myserviceb
  uid: 23b28464-7e25-46eb-ba74-8cdd873c11c1
spec:
  tls:
  - hosts:
    - myk8s.tpk.best
    secretName: myk8s.tpk.best-cert
  rules:
  - host: myk8s.tpk.best
    http:
      paths:
      - backend:
          serviceName: azure-vote-front
          servicePort: 80
        path: /
        pathType: ImplementationSpecific
status:
  loadBalancer:
    ingress:
    - ip: 192.168.1.74
Lets’ update:
builder@DESKTOP-2SQ9NQM:~$ kubectl apply -f ingress.yaml
ingress.extensions/ingress-myserviceb configured

Next steps
Our next steps will include adding more k3s servers (when I identify fitting hardware)
isaac@isaac-MacBookPro:~$ sudo cat /var/lib/rancher/k3s/server/node-token
[sudo] password for isaac:
K10779e593bb0febe3227521.... snip

# on target
curl -sfL https://get.k3s.io | K3S_URL=https://192.168.1.74:6443 K3S_TOKEN=K10779e593bb0febe3227521... sh -
Summary
Using older hardware, like great machines Apple has stopped supporting, is a cheap and easy way to create a home cluster that doesnt rely on Pi's and their ARM nuances. It was relatively easy to spin a retired, but very functional, MacBook Pro into a proper k3s single node cluster and serve traffic.
You are welcome to vote on Cats vs Dogs, the current survey up presently: https://myk8s.tpk.best/ (which routes to an app running on a cluster next to my desk).