Rancher calls itself simply "Multi-Cluster Kubernetes Management" and that fairly sums it up. It's an app, most often run as a container that can handle the creation of k8s clusters over a variety of Clouds and systems and really simplify the management of various k8s clusters. Let's russle up some servers and take this cowhand out for a ride.
Installation
First, while not technically required, it's advisable to have a proper domain to host this in. As all the clusters you spin up will need to phone home, unless you are only doing private servers inhouse that have no egress, you'll want properly signed SSL communicated between rancher and the world.
Our first step is to get a domain;
I tend to use Gandi.net as they’ve been a reliable French registrar for me for over 10 years and I can find cheap domains here for testing/playground sites. However, DO has guides for many other registrars as well.

Once complete, go to your Domains and pick a domain to move to DO. You’ll want to change the Nameservers section

Then we'll change it to Digital Ocean were we will host our rancher instance:
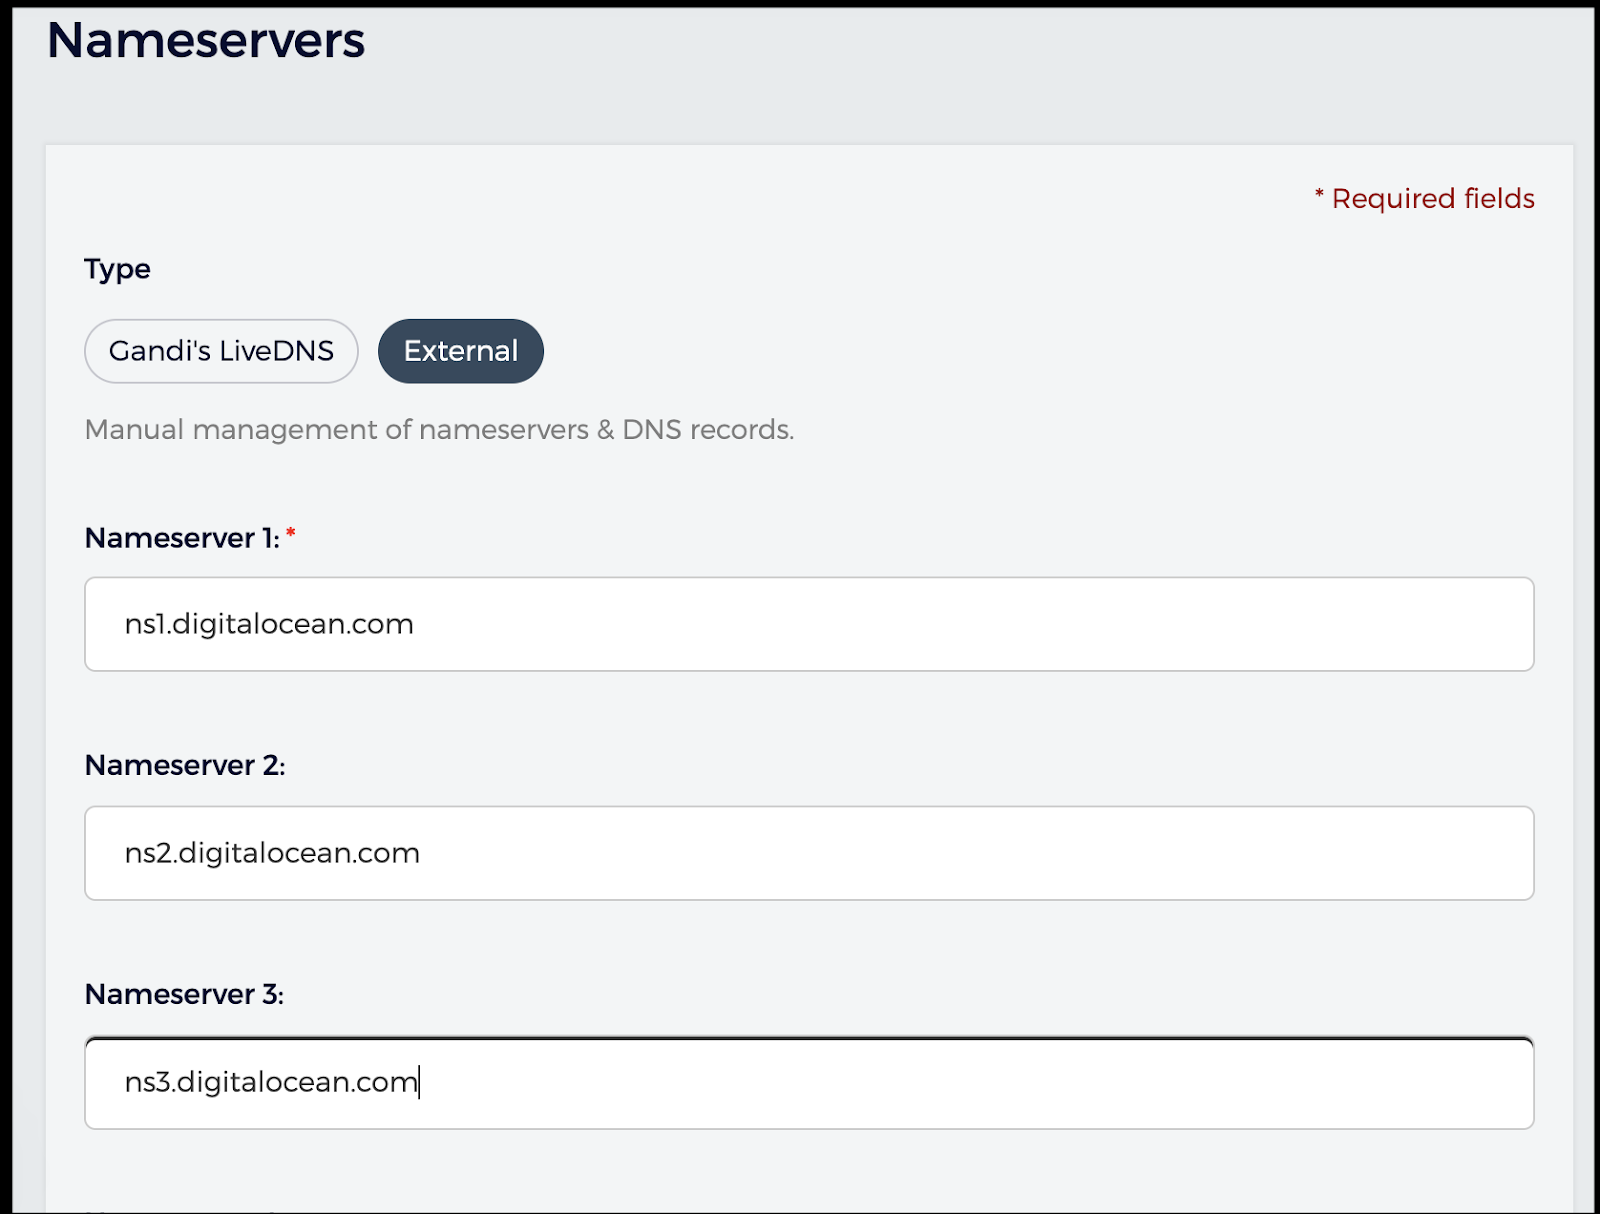
Click save and in a moment, you should see the change reflected:

Next, we need to add them to DO so we can use them.
We'll need to create a project for the domain:

Next, click Create/Domain in DO:


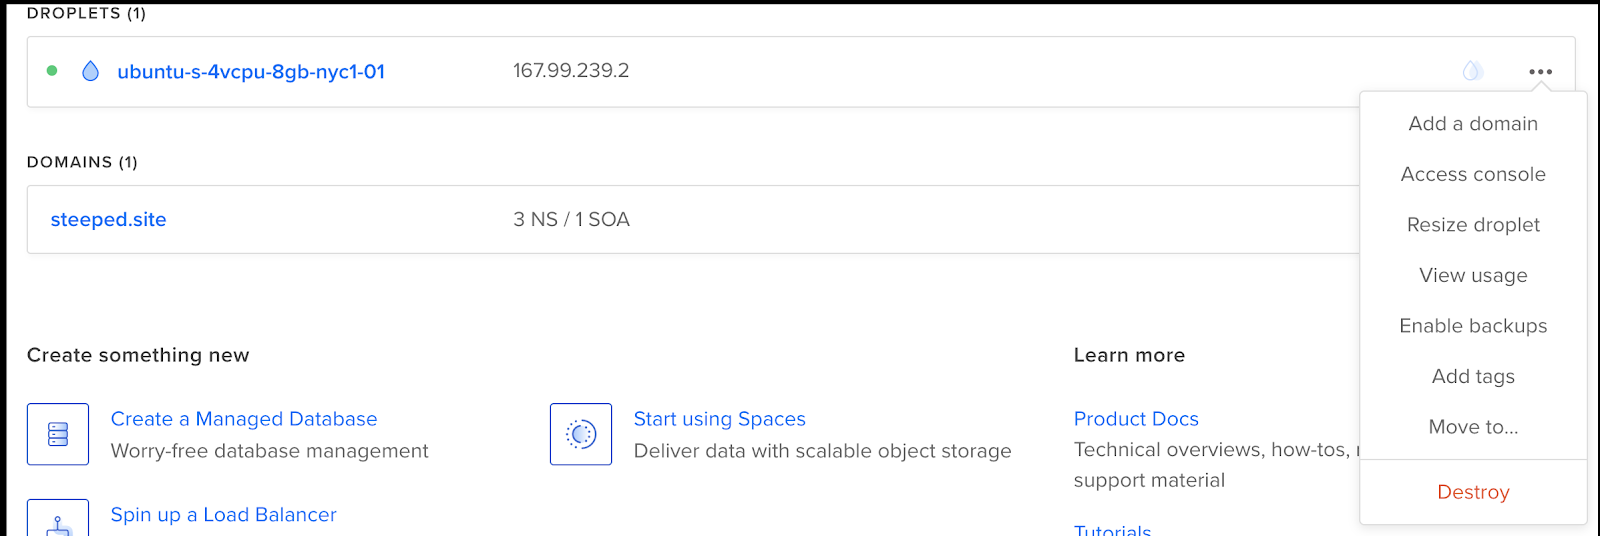
Next, we’ll need to create a droplet to start rancher and also to use for getting our SSL cert:

Click finish and wait for the droplet to finish being created. When complete, we’ll click the elipse at the end to add a domain:

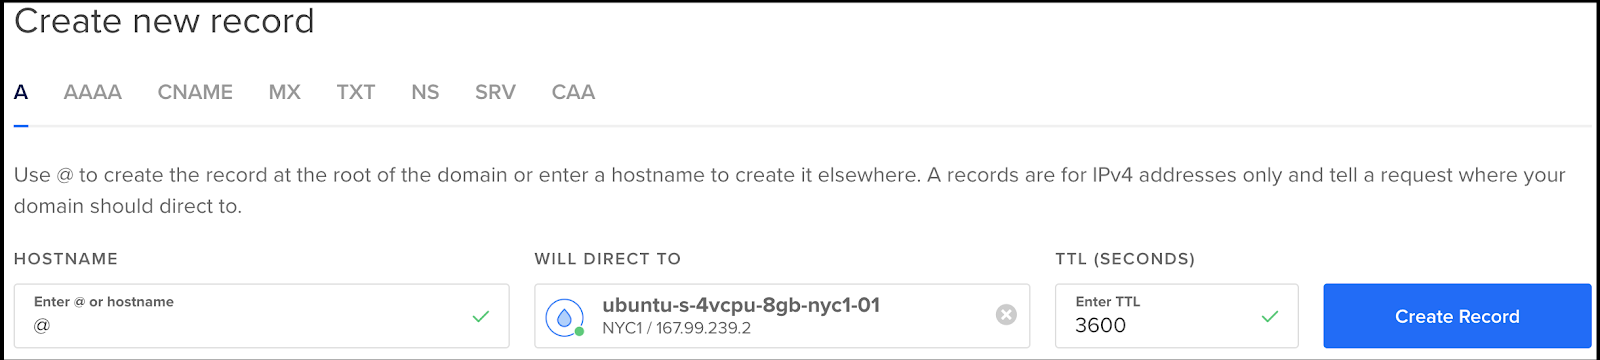
Once added, we should see an A record created:

Note: To do the root (@) domain, we’ll need to enable IPv6 if we havent already:


Note: use the “@” for the domain entry (e.g. "https://steeped.site"):
Now we’ll need to SSH in and set things up so we can get a let’s encrypt ssh key:

Log in and do the following:
add-apt-repository ppa:certbot/certbot
apt-get update
apt-get upgrade
apt-get install python-certbot-nginx
Then add an entry for the domain we used above (rancher.steeped.site in my case):
cat /etc/nginx/sites-available/default | grep steeped
	server_name rancher.steeped.site steeped.site;
Verify the nginx syntax and if its good, reload nginx:
root@ubuntu-s-4vcpu-8gb-nyc1-01:~# sudo nginx -t
nginx: the configuration file /etc/nginx/nginx.conf syntax is ok
nginx: configuration file /etc/nginx/nginx.conf test is successful
root@ubuntu-s-4vcpu-8gb-nyc1-01:~# sudo systemctl reload nginx
Even though ufw is inactive, let’s configure for when we do that later:
root@ubuntu-s-4vcpu-8gb-nyc1-01:~# sudo ufw status
Status: inactive
root@ubuntu-s-4vcpu-8gb-nyc1-01:~# ufw allow 'Nginx Full'
Rules updated
Rules updated (v6)
root@ubuntu-s-4vcpu-8gb-nyc1-01:~# ufw delete allow 'Nginx HTTP'
Could not delete non-existent rule
Could not delete non-existent rule (v6)
Now, if we’ve set the domain room (an A record for @ to our IPv4 and rancher cname), we can then do the next step:


Run certbot:
root@ubuntu-s-4vcpu-8gb-nyc1-01:~# sudo certbot --nginx -d steeped.site -d rancher.steeped.site
Saving debug log to /var/log/letsencrypt/letsencrypt.log
Plugins selected: Authenticator nginx, Installer nginx
Starting new HTTPS connection (1): acme-v02.api.letsencrypt.org
Obtaining a new certificate
Performing the following challenges:
http-01 challenge for steeped.site
Waiting for verification...
Cleaning up challenges
Resetting dropped connection: acme-v02.api.letsencrypt.org
Deploying Certificate to VirtualHost /etc/nginx/sites-enabled/default
Deploying Certificate to VirtualHost /etc/nginx/sites-enabled/default

Please choose whether or not to redirect HTTP traffic to HTTPS, removing HTTP access.
- - - - - - - - - - - - - - - - - - - - - - - - - - - - - - - - - - - - - - - -
1: No redirect - Make no further changes to the webserver configuration.
2: Redirect - Make all requests redirect to secure HTTPS access. Choose this for
new sites, or if you're confident your site works on HTTPS. You can undo this
change by editing your web server's configuration.
- - - - - - - - - - - - - - - - - - - - - - - - - - - - - - - - - - - - - - - -
Select the appropriate number [1-2] then [enter] (press 'c' to cancel): 2
Redirecting all traffic on port 80 to ssl in /etc/nginx/sites-enabled/default
Redirecting all traffic on port 80 to ssl in /etc/nginx/sites-enabled/default

- - - - - - - - - - - - - - - - - - - - - - - - - - - - - - - - - - - - - - - -
Congratulations! You have successfully enabled https://steeped.site and
https://rancher.steeped.site

You should test your configuration at:
https://www.ssllabs.com/ssltest/analyze.html?d=steeped.site
https://www.ssllabs.com/ssltest/analyze.html?d=rancher.steeped.site
- - - - - - - - - - - - - - - - - - - - - - - - - - - - - - - - - - - - - - - -

IMPORTANT NOTES:
 - Congratulations! Your certificate and chain have been saved at:
   /etc/letsencrypt/live/steeped.site/fullchain.pem
   Your key file has been saved at:
   /etc/letsencrypt/live/steeped.site/privkey.pem
   Your cert will expire on 2019-08-16. To obtain a new or tweaked
   version of this certificate in the future, simply run certbot again
   with the "certonly" option. To non-interactively renew *all* of
   your certificates, run "certbot renew"
 - If you like Certbot, please consider supporting our work by:

   Donating to ISRG / Let's Encrypt:   https://letsencrypt.org/donate
   Donating to EFF:                    https://eff.org/donate-le

root@ubuntu-s-4vcpu-8gb-nyc1-01:~#
I don’t want to keep this host forever.. So let’s get those PEM files off…
root@ubuntu-s-4vcpu-8gb-nyc1-01:~# cat /etc/letsencrypt/live/steeped.site/fullchain.pem | head -n1
-----BEGIN CERTIFICATE-----
Let’s copy them off (base on my laptop):
$ scp root@167.99.239.2:/etc/letsencrypt/live/steeped.site/privkey.pem ~/steeped.site.privkey.pem
root@167.99.239.2's password:
privkey.pem                                   100% 1708    35.7KB/s   00:00

$ scp root@167.99.239.2:/etc/letsencrypt/live/steeped.site/fullchain.pem ~/steeped.site.fullchain.pem
root@167.99.239.2's password:
fullchain.pem                                 100% 3578    83.1KB/s   00:00
Next steps…
Make sure we have docker installed:
root@ubuntu-s-4vcpu-8gb-nyc1-01:~# apt-get install docker
Reading package lists... Done
Building dependency tree
Reading state information... Done
The following package was automatically installed and is no longer required:
  grub-pc-bin
Use 'sudo apt autoremove' to remove it.
The following NEW packages will be installed:
  docker
0 upgraded, 1 newly installed, 0 to remove and 2 not upgraded.
Need to get 12.2 kB of archives.
After this operation, 65.5 kB of additional disk space will be used.
Get:1 http://mirrors.digitalocean.com/ubuntu xenial/universe amd64 docker amd64 1.5-1 [12.2 kB]
Fetched 12.2 kB in 0s (357 kB/s)
Selecting previously unselected package docker.
(Reading database ... 55688 files and directories currently installed.)
Preparing to unpack .../docker_1.5-1_amd64.deb ...
Unpacking docker (1.5-1) ...
Processing triggers for man-db (2.7.5-1) ...
Setting up docker (1.5-1) ...
root@ubuntu-s-4vcpu-8gb-nyc1-01:~# apt install docker.io
Reading package lists... Done
Building dependency tree
Reading state information... Done
The following package was automatically installed and is no longer required:
  grub-pc-bin
Use 'apt autoremove' to remove it.
The following additional packages will be installed:
  bridge-utils cgroupfs-mount libltdl7 pigz ubuntu-fan
Suggested packages:
  mountall aufs-tools debootstrap docker-doc rinse zfs-fuse | zfsutils
The following NEW packages will be installed:
  bridge-utils cgroupfs-mount docker.io libltdl7 pigz ubuntu-fan
0 upgraded, 6 newly installed, 0 to remove and 2 not upgraded.
Need to get 47.2 MB of archives.
After this operation, 235 MB of additional disk space will be used.
Do you want to continue? [Y/n] Y
Get:1 http://mirrors.digitalocean.com/ubuntu xenial/universe amd64 pigz amd64 2.3.1-2 [61.1 kB]
Get:2 http://mirrors.digitalocean.com/ubuntu xenial/main amd64 bridge-utils amd64 1.5-9ubuntu1 [28.6 kB]
Get:3 http://mirrors.digitalocean.com/ubuntu xenial/universe amd64 cgroupfs-mount all 1.2 [4,970 B]
Get:4 http://mirrors.digitalocean.com/ubuntu xenial/main amd64 libltdl7 amd64 2.4.6-0.1 [38.3 kB]
Get:5 http://mirrors.digitalocean.com/ubuntu xenial-updates/universe amd64 docker.io amd64 18.09.2-0ubuntu1~16.04.1 [47.0 MB]
Get:6 http://mirrors.digitalocean.com/ubuntu xenial-updates/main amd64 ubuntu-fan all 0.12.8~16.04.3 [35.1 kB]
Fetched 47.2 MB in 0s (80.1 MB/s)
Preconfiguring packages ...
Selecting previously unselected package pigz.
(Reading database ... 55695 files and directories currently installed.)
Preparing to unpack .../pigz_2.3.1-2_amd64.deb ...
Unpacking pigz (2.3.1-2) ...
Selecting previously unselected package bridge-utils.
Preparing to unpack .../bridge-utils_1.5-9ubuntu1_amd64.deb ...
Unpacking bridge-utils (1.5-9ubuntu1) ...
Selecting previously unselected package cgroupfs-mount.
Preparing to unpack .../cgroupfs-mount_1.2_all.deb ...
Unpacking cgroupfs-mount (1.2) ...
Selecting previously unselected package libltdl7:amd64.
Preparing to unpack .../libltdl7_2.4.6-0.1_amd64.deb ...
Unpacking libltdl7:amd64 (2.4.6-0.1) ...
Selecting previously unselected package docker.io.
Preparing to unpack .../docker.io_18.09.2-0ubuntu1~16.04.1_amd64.deb ...
Unpacking docker.io (18.09.2-0ubuntu1~16.04.1) ...
Selecting previously unselected package ubuntu-fan.
Preparing to unpack .../ubuntu-fan_0.12.8~16.04.3_all.deb ...
Unpacking ubuntu-fan (0.12.8~16.04.3) ...
Processing triggers for man-db (2.7.5-1) ...
Processing triggers for ureadahead (0.100.0-19.1) ...
Processing triggers for systemd (229-4ubuntu21.21) ...
Processing triggers for libc-bin (2.23-0ubuntu11) ...
Setting up pigz (2.3.1-2) ...
Setting up bridge-utils (1.5-9ubuntu1) ...
Setting up cgroupfs-mount (1.2) ...
Setting up libltdl7:amd64 (2.4.6-0.1) ...
Setting up docker.io (18.09.2-0ubuntu1~16.04.1) ...
Adding group `docker' (GID 116) ...
Done.
Setting up ubuntu-fan (0.12.8~16.04.3) ...
Processing triggers for ureadahead (0.100.0-19.1) ...
Processing triggers for systemd (229-4ubuntu21.21) ...
Processing triggers for libc-bin (2.23-0ubuntu11) ...
root@ubuntu-s-4vcpu-8gb-nyc1-01:~#
Stop Nginx and Fire up rancher:
root@ubuntu-s-4vcpu-8gb-nyc1-01:~# systemctl stop nginx
root@ubuntu-s-4vcpu-8gb-nyc1-01:~# docker run -d --restart=unless-stopped -p 80:80 -p 443:443 -v /host/rancher:/var/lib/rancher rancher/rancher --acme-domain rancher.steeped.site
Unable to find image 'rancher/rancher:latest' locally
latest: Pulling from rancher/rancher
f476d66f5408: Pull complete
8882c27f669e: Pull complete
d9af21273955: Pull complete
f5029279ec12: Pull complete
9144d1997327: Pull complete
00b9797dd802: Pull complete
19daf411a05b: Pull complete
7b95d4cbcb10: Pull complete
ec42ed11057b: Pull complete
4aa06b39c2e3: Extracting [========================>                          ]  10.32MB/21.46MB
0f7d403ede89: Download complete
2d0c6eb622dc: Download complete
Verify it’s running:
root@ubuntu-s-4vcpu-8gb-nyc1-01:~# docker ps
CONTAINER ID        IMAGE               COMMAND                  CREATED             STATUS              PORTS                                      NAMES
1235f2c7520b        rancher/rancher     "entrypoint.sh --acm…"   28 seconds ago      Up 27 seconds       0.0.0.0:80->80/tcp, 0.0.0.0:443->443/tcp   modest_mclaren
And now we can login for the first time:

Once the password is set, we can start to set up a cluster:

DigitalOcean
Let’s create a DO cluster sandbox using flannel;

You’ll need to click the Add template to add your DO API token and setup the class of machines you want to use. Then when you click create, rancher will create the cluster:


Soon you should be able to see the droplets show up in DO:

When done we can see the dashboard for our cluster:

This is great, but how can we use it?
First, let’s add the stable catalogue (https://github.com/helm/charts/) in Tools/Catalogs:

Go to Apps on the main screen and search for Sonarqube:

We will copy the values (see template section at bottom) and change the ingress to true and set our hostname:

Click Launch to launch it

However, no matter how i tried, it seems that stable helm chart is not liking rancher. I did try other applications and those worked (such as a blog).
Let's try launching Sonar another way. I went to the cluster page and got the kubectl config and followed steps to copy locally. Then i checked for the namespaces to ensure i could interact with the cluster:

$ vi ~/.kube/config
$ kubectl get namespaces
NAME              STATUS   AGE
cattle-system     Active   28m
default           Active   29m
ingress-nginx     Active   28m
kube-node-lease   Active   29m
kube-public       Active   29m
kube-system       Active   29m
sonarqube         Active   11m
sonarqube-4lg46   Active   2m23s
sonarqube-zm8nt   Active   6m15s
Setup Helm
$ helm init
$HELM_HOME has been configured at /Users/isaac.johnson/.helm.

Tiller (the Helm server-side component) has been installed into your Kubernetes Cluster.

Please note: by default, Tiller is deployed with an insecure 'allow unauthenticated users' policy.
To prevent this, run `helm init` with the --tiller-tls-verify flag.
For more information on securing your installation see: https://docs.helm.sh/using_helm/#securing-your-helm-installation
Happy Helming!

$ kubectl create serviceaccount --namespace kube-system tiller
serviceaccount/tiller created

$ kubectl create clusterrolebinding tiller-cluster-rule --clusterrole=cluster-admin --serviceaccount=kube-system:tiller
clusterrolebinding.rbac.authorization.k8s.io/tiller-cluster-rule created

$ kubectl patch deploy --namespace kube-system tiller-deploy -p '{"spec":{"template":{"spec":{"serviceAccount":"tiller"}}}}'
deployment.extensions/tiller-deploy patched
I then downloaded the stable values.yaml and changed ingress to true and set the domain name: https://raw.githubusercontent.com/helm/charts/master/stable/sonarqube/values.yaml
# showing the change
$ cat values.yaml | head -n35 | tail -n10
  # loadBalancerIP: 1.2.3.4
ingress:
  enabled: true
  # Used to create an Ingress record.
  hosts:
    - name: sonar.steeped.site
      # default paths for "/" and "/*" will be added
      path: /
      # If a different path is defined, that path and {path}/* will be added to the ingress resource
      # path: /sonarqube
Now install:
$ helm install stable/sonarqube -f ./values.yaml
NAME:   billowing-robin
LAST DEPLOYED: Sat May 18 17:21:52 2019
NAMESPACE: default
STATUS: DEPLOYED

RESOURCES:
==> v1/ConfigMap
NAME                                       DATA  AGE
billowing-robin-sonarqube-config           0     1s
billowing-robin-sonarqube-copy-plugins     1     1s
billowing-robin-sonarqube-install-plugins  1     1s
billowing-robin-sonarqube-tests            1     1s

==> v1/PersistentVolumeClaim
NAME                        STATUS   VOLUME  CAPACITY  ACCESS MODES  STORAGECLASS  AGE
billowing-robin-postgresql  Pending  1s

==> v1/Pod(related)
NAME                                        READY  STATUS             RESTARTS  AGE
billowing-robin-postgresql-b789fb9d7-p8pgk  0/1    Pending            0         1s
billowing-robin-sonarqube-7f6b9c8bd8-fklkp  0/1    ContainerCreating  0         1s

==> v1/Secret
NAME                        TYPE    DATA  AGE
billowing-robin-postgresql  Opaque  1     1s

==> v1/Service
NAME                        TYPE          CLUSTER-IP     EXTERNAL-IP  PORT(S)         AGE
billowing-robin-postgresql  ClusterIP     10.43.117.86   <none>       5432/TCP        1s
billowing-robin-sonarqube   LoadBalancer  10.43.155.222  <pending>    9000:30132/TCP  1s

==> v1beta1/Deployment
NAME                        READY  UP-TO-DATE  AVAILABLE  AGE
billowing-robin-postgresql  0/1    1           0          1s
billowing-robin-sonarqube   0/1    1           0          1s

==> v1beta1/Ingress
NAME                       HOSTS               ADDRESS  PORTS  AGE
billowing-robin-sonarqube  sonar.steeped.site  80       1s


NOTES:
1. Get the application URL by running these commands:
  http://map[name:sonar.steeped.site path:/]
Here is where i will pause for a moment to say that off the bat, there was no default persistant volume handling in the cluster. I've had this issue with Kubespray launched systems as well. I tried a few things, but in the end, the NFS approach was the fastest working method. I also read that glusterfs was another easy approach.
Add NFS app for PVC

Now create the PVC manually:
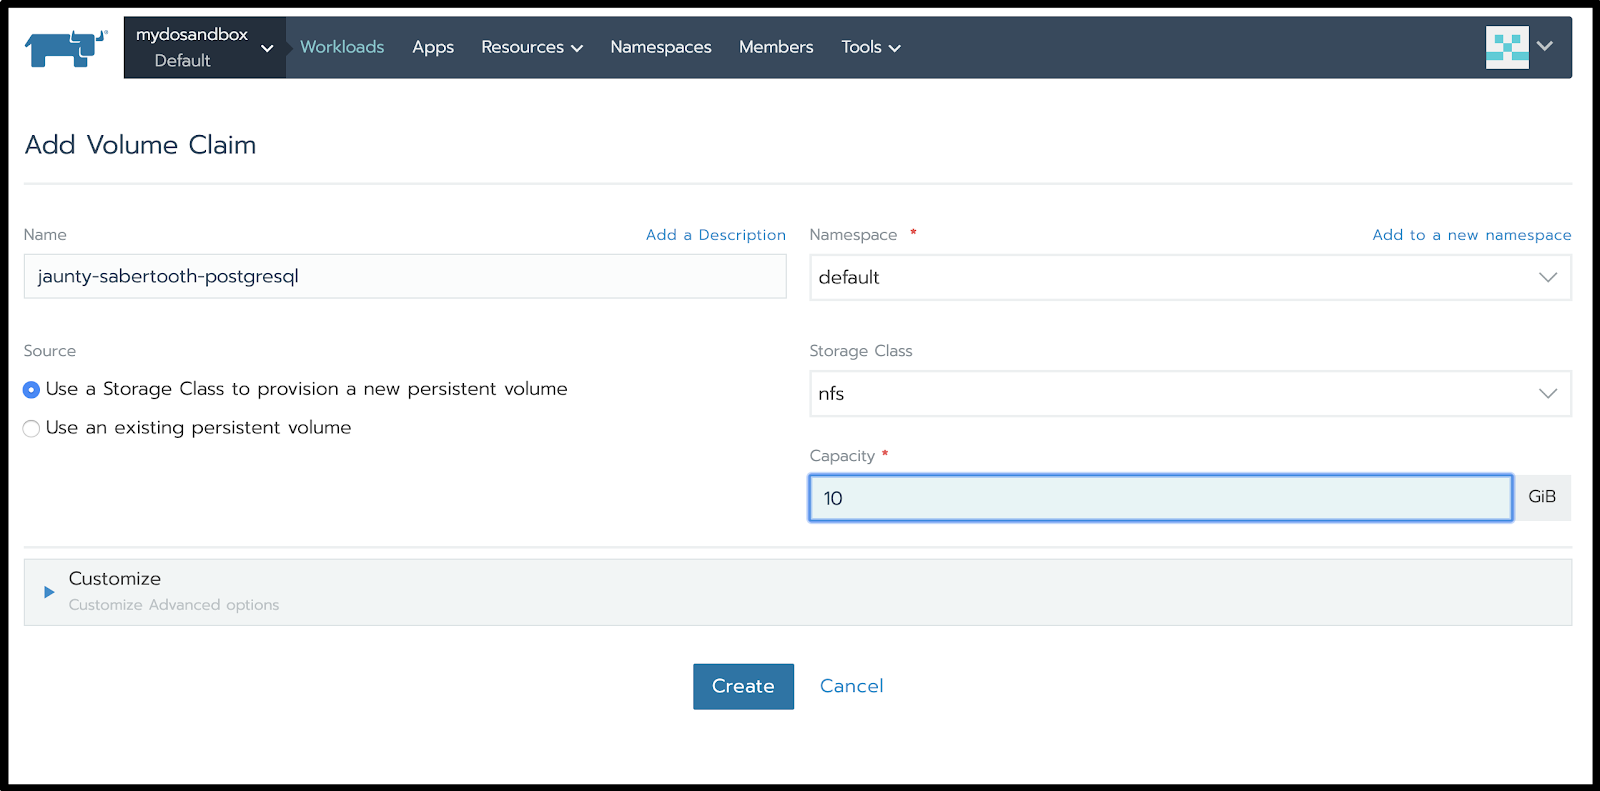
Once you’ve created the PVCs the Sonarqube pods are waiting on:

They should come up clean eventually...
NAME                                            READY   STATUS    RESTARTS   AGE
jaunty-sabertooth-postgresql-867bf9d697-zhpgx   1/1     Running   2          27m
jaunty-sabertooth-sonarqube-7489bb8c86-qxnzz    0/1     Running   4          13m
We can see that the LoadBalancer entries were made:

However, I did not get the domain name ingress to work - i imagine i had the nginx rule wrong in some way.
Scaling out:
It's easy to just hit the plus or minus sign in “Pods” column when viewing your cluster to spin a new node. When my cluster was slowing down, i easily added a 4th worker:

Vertical resizing:
You can go to any node and change its size via Resize in DigitalOcean:

It was in fact, scaling the cluster up, that solved the issues with sonarqube app:
kubectl port-forward jaunty-sabertooth-sonarqube-7489bb8c86-qxnzz  9000:9000
Forwarding from 127.0.0.1:9000 -> 9000
Forwarding from [::1]:9000 -> 9000
Handling connection for 9000

$ kubectl get pods
NAME                                            READY   STATUS    RESTARTS   AGE
jaunty-sabertooth-postgresql-867bf9d697-zhpgx   1/1     Running   3          15h
jaunty-sabertooth-sonarqube-7489bb8c86-qxnzz    1/1     Running   6          14h
Other Clouds
You can use Rancher to create clusters in other clouds as well.
AKS
For instance, for AKS, create a SP (and make sure to add to a sufficient role in your subscription or you’ll get 403 errors).

In the next page, you can read your id_rsa.pub from a terminal into the clipboad with pbcopy:
$ cat ~/.ssh/id_rsa.pub | pbcopy
Paste that in the bottom:


And in a few minutes, our new AKS cluster arrives:

Which i see in Azure just as easily:

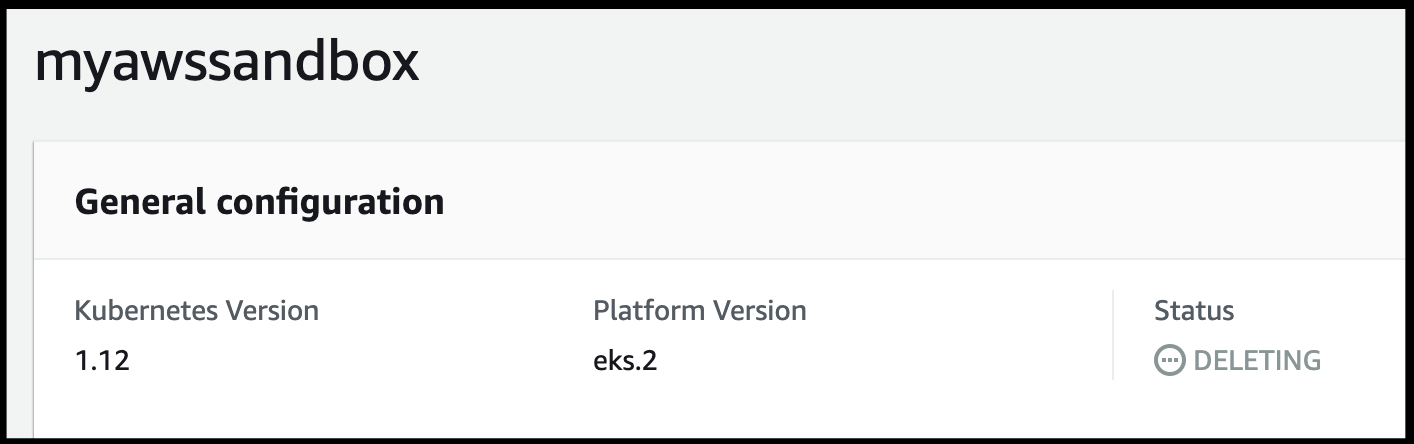
And should i delete the cluster in Rancher:


I saw it deleted almost all the Azure resources related to this cluster:

AWS
We can add AWS just as easily. While it asked for session token and keys, i found only an IAM create access and secret would work:


And we can see the EKS cluster reflected in Amazon as well:

GKE
GKE, like the others, will require a service user to be created:
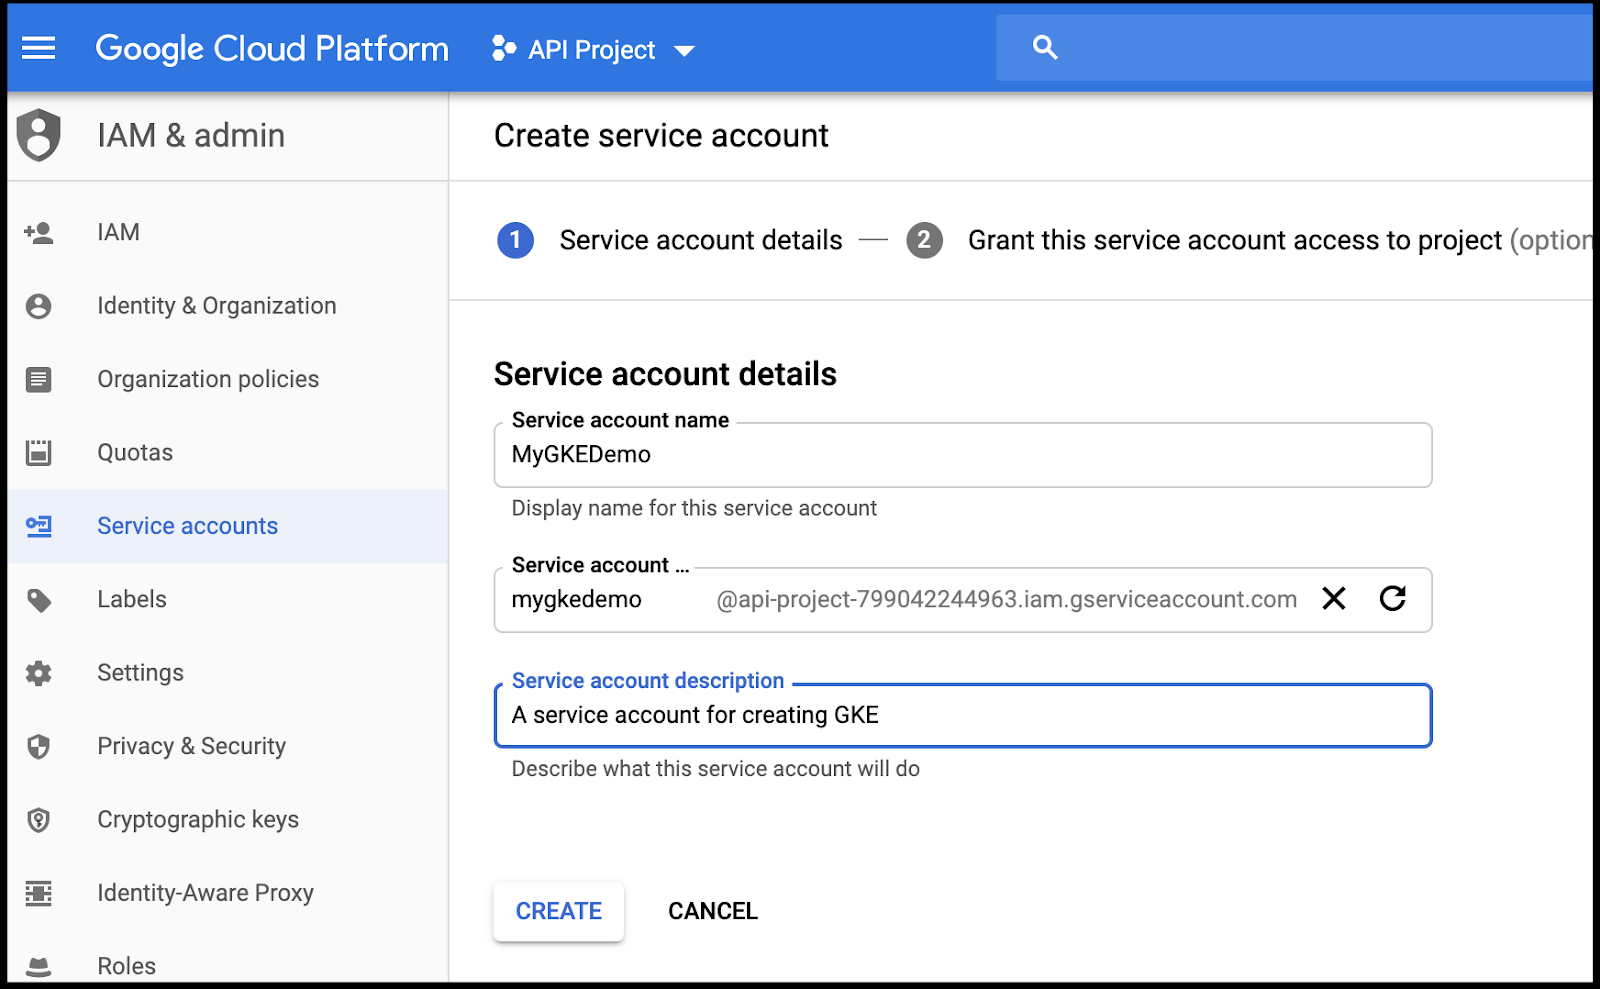
On the next page “create a key” to download a JSON file with the private key this service user can use.
You can then read that file in:

You’ll need to follow the URL in the error to enable the GKE API if you haven't before (which is likely the case for a new service account):

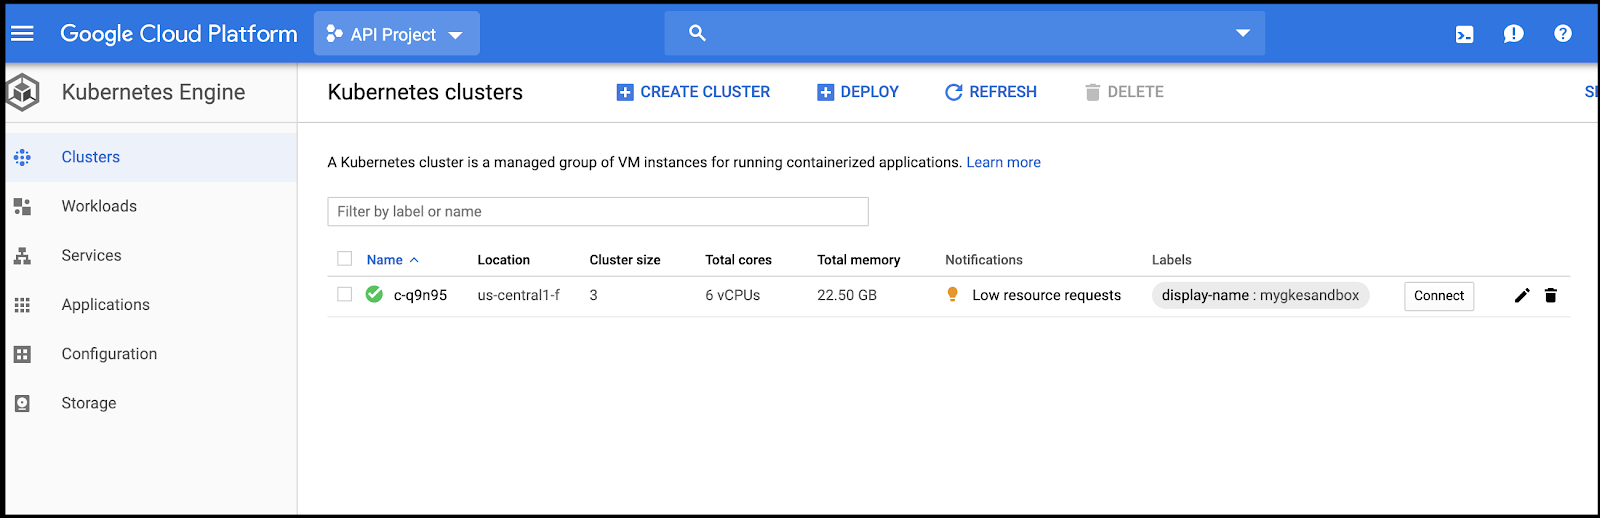
Once that is sorted, finishing will start the provisioning of a GKE cluster:

When done, we can see the cluster in GKE as well as Rancher:
Other Features of Rancher:
You can launch Kubectl commands right from the app itself:

I also liked how i could create storage shares in one cloud and use them in another. For instance, the first time i was working though getting Sonarqube up and running, i used AFS mounts in the DigitalOcean cluster. They failed, of course, as AFS doesn’t let one set file permissions which broke the pgdata file creation - but it did mount them.
This creates the possibility of launching clusters in different cloud providers than our storage.
Rancher also has a CLI as well which you can download from their site or from the link on the bottom right corner of the API&Keys page:
The “bearer token” is what you use to login on the CLI (i expired this token already)
$ ./rancher login --token token-6p9vc:dff6fcxmflcqxqxhq6c7wjk6dvdx78grgktvtpn5zl9t65rdf4xnbk https://rancher.steeped.site
NUMBER    CLUSTER NAME   PROJECT ID        PROJECT NAME   PROJECT DESCRIPTION
1         myawssandbox   c-kbzfx:p-87v82   System         System project created for the cluster
2         myawssandbox   c-kbzfx:p-gzjff   Default        Default project created for the cluster
3         mydosandbox    c-mxl9c:p-7hvsf   Default        Default project created for the cluster
4         mydosandbox    c-mxl9c:p-rlsxq   System         System project created for the cluster
5         mygkesandbox   c-q9n95:p-6x84x   System         System project created for the cluster
6         mygkesandbox   c-q9n95:p-fzsw5   Default        Default project created for the cluster
Select a Project:2
INFO[0256] Saving config to /Users/isaac.johnson/.rancher/cli2.json

$ ./rancher clusters
CURRENT   ID        STATE     NAME           PROVIDER                    NODES     CPU         RAM             PODS
*         c-kbzfx   active    myawssandbox   Unknown                     3         0.53/3      0.14/10.71 GB   12/36
          c-mxl9c   active    mydosandbox    Rancher Kubernetes Engine   4         0.99/10     0.63/17.08 GB   25/440
          c-q9n95   active    mygkesandbox   Google Kubernetes Engine    3         1.26/5.79   1.20/16.51 GB   21/330
This could be handy when used with watch to keep an eye on all your clusters:

Using the CLI, One can look at nodes:
One can look at nodes:
$ ./rancher nodes ls
ID                      NAME                                            STATE     POOL      DESCRIPTION
c-kbzfx:machine-6rb7v   ip-192-168-174-190.us-west-2.compute.internal   active
c-kbzfx:machine-nhksd   ip-192-168-84-115.us-west-2.compute.internal    active
c-kbzfx:machine-ntzpf   ip-192-168-225-238.us-west-2.compute.internal   active
However other features i wanted to explore didn’t seem working:
$ ./rancher ssh c-kbzfx:machine-6rb7v
FATA[0000] failed to find SSH key for ip-192-168-174-190.us-west-2.compute.internal

$ ./rancher clusters add-node --worker c-mxl9c
FATA[0000] a node can't be added to the cluster this way
$ ./rancher clusters add-node --worker c-q9n95
FATA[0000] a node can't be added to the cluster this way
$ ./rancher clusters add-node --worker c-kbzfx
FATA[0000] a node can't be added to the cluster this way
But the CLI does offer a handy way to run kubectl without having to fetch the kubeconfig each time:
$ ./rancher kubectl get pods --all-namespaces
NAMESPACE       NAME                                    READY   STATUS    RESTARTS   AGE
cattle-system   cattle-cluster-agent-7d5c999dc4-w55wj   1/1     Running   0          121m
cattle-system   cattle-node-agent-6lpcr                 1/1     Running   0          120m
cattle-system   cattle-node-agent-j7jzb                 1/1     Running   0          120m
cattle-system   cattle-node-agent-mr4bn                 1/1     Running   0          120m
kube-system     aws-node-g6gz9                          1/1     Running   0          121m
kube-system     aws-node-hdbsq                          1/1     Running   0          121m
kube-system     aws-node-lgp5r                          1/1     Running   0          121m
kube-system     coredns-6fdd4f6856-nc5k2                1/1     Running   0          127m
kube-system     coredns-6fdd4f6856-v6cbf                1/1     Running   0          127m
kube-system     kube-proxy-lbnhb                        1/1     Running   0          121m
kube-system     kube-proxy-t4bbr                        1/1     Running   0          121m
kube-system     kube-proxy-tkgng                        1/1     Running   0          121m
Final notes
One thing we need to do is to ensure that our rancher app launches the container on boot and not nginx. After a few times doing this manually, i finally fixed it for good:
systemctl stop nginx
systemctl disable nginx
systemctl enable docker
docker run -d --restart=always -p 80:80 -p 443:443 -v /host/rancher:/var/lib/rancher rancher/rancher --acme-domain rancher.steeped.site
The key differences above; always start on docker start/restart and disable nginx and enable docker to start on boot.
Summary

In the end we set up clusters in four different cloud providers. Once one sorts out the specific keys and tokens the UI wants, it was easy to create clusters as well as tear them down.

We experimented with launching apps via Rancher and used the CLI as well to query our clusters and nodes.
Rancher fell a bit short on fronting helm charts (Sonar never seemed to launch) after adding custom catalogues and has the disadvantage of needing a publicly facing endpoint running all the time to coordinate clusters.
Also, we did not explore all the ways Rancher can authenticate, but from exploring the settings, it would be easy to add AD auth:

I can certainly imagine an organization that has to manage multiple clouds finding Rancher a very clean way to manage them if they choose not to go the Terraform route.